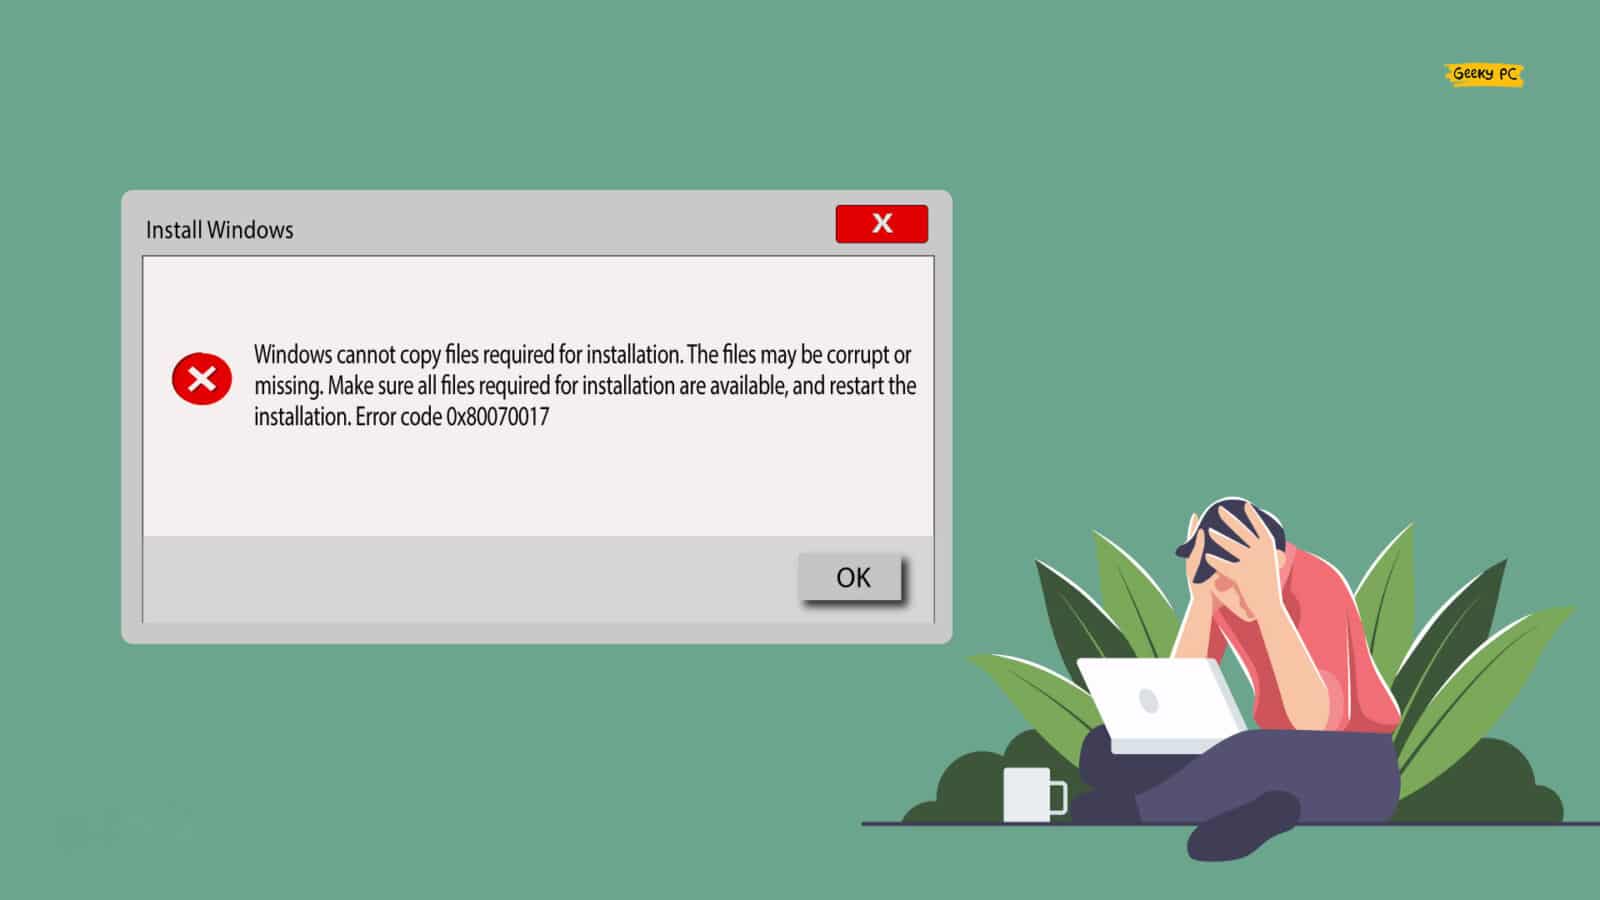
Updating your Windows OS is absolutely necessary to have a seamless experience. But don’t you feel annoyed when the Windows installation error 0x80070017 suddenly triggers on your system? We all do!
You can resolve the 0x80070017 error code by restarting your device into safe mode or giving it a clean reboot. Besides, you can disable the antivirus and firewall to fix it. If nothing works, you can note down the KB number and download the file manually from the Microsoft update catalog.
However, these are not the only solutions that can effectively resolve this issue. But, before we dive deep into the solutions to this error, let’s understand what the 0x80070017 error code actually is and what are the primary reasons behind it.
What Windows Installation Error Code 0x80070017 Actually Is?
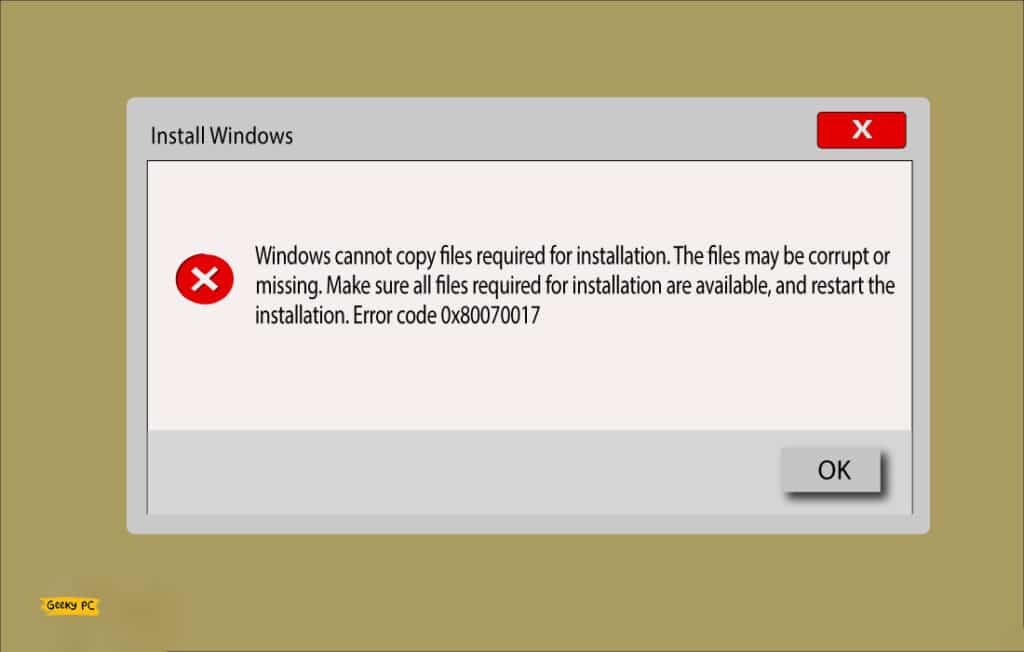
The error code 0x80070017 in Windows systems typically triggers when the OS can’t find or copy the necessary files for an installation.
If your OS can’t copy the installation file from your hard drive with the same structure, this issue can also trigger, and the installation may stop abruptly.
It mainly happens when there is a corrupt or missing file in the installation directory. This issue can also trigger if any installation file is modified or corrupted due to external interference, such as a phishing attack or virus-related issues.
What Are The Primary Reasons Behind Windows Installation Error 0x80070017?
Although the Windows installation error 0x80070017 is pretty common these days that can affect the installation procedure on your system, there can be many reasons behind it. However, if you consider a broader spectrum, this issue typically triggers due to six main reasons.
- You are using an outdated version of the Windows OS that needs an update.
- The Windows registry is corrupted and has wrong values.
- HDD or external drive from where you are trying to install is malfunctioning.
- Any malware or virus may have infected the root directories in your system.
- Any startup application or background process is interfering with the installation.
- Your antivirus program or firewall is restricting Windows OS from performing the installation process.
Besides these six, there are many other reasons for which this 0x80070017 error code can typically occur, such as a corrupted Windows update component.
However, there are some generic and advanced methods available to fix this issue.
6+ Easy Fixes For The Windows Installation Error Code 0x80070017
Before you try any pro methods that need advanced tweaks on your system to resolve the Windows installation error 0x80070017, you should proceed with the generic fixes.
And in almost 80% of the cases, these generic fixes alone are sufficient to resolve this issue.
1. Check Your Hard Drive
Windows installation failure can easily occur if the installation file can’t access your hard drive properly. It mainly happens if you have any bad sector in your HDD. So, before trying anything else, check your hard drive to know if it is functioning properly or not.
- Step 1: Press the “Windows Key + R” buttons together to launch the “Run” command.
- Step 2: Once the new popup box appears, type “CMD” and click “OK” to launch it.
- Step 3: Once the black window of “Command Prompt” opens, type “
chkdsk /r c:” and hit enter. (If “C:” is your default system drive)
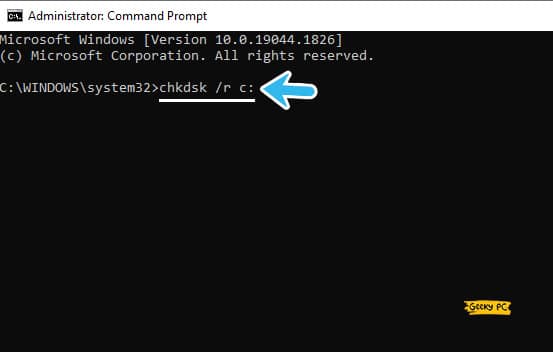
- Step 4: Let the “Check Disk” application thoroughly analyze your hard disk, and type “Exit” once it is done.
- Step 5: Now, restart your device and try to install the Windows component again.
Regular SATA hard drives are extremely prone to bad and dead sectors. So, if you have too many bad sectors in your old-school SATA drive, it is better to replace it with a new SSD drive.
Besides, you can also opt for a new-generation NVME hard drive, as these are way faster than SATA drives. If you are also facing a similar situation, follow our detailed guide to fixing the “Thread Stuck in Device Driver” error in Windows systems.
2. Restart Your Device In Safe Mode
If any third-party startup application or any preinstalled app interferes with your installation process, you may get the Windows error 0x80070017 on your system. However, that can be easily rectified by restarting your device into a safe mode without any interference from the startup apps.
- Step 1: Press the “Windows Key + I” buttons together to launch the “Settings” app.
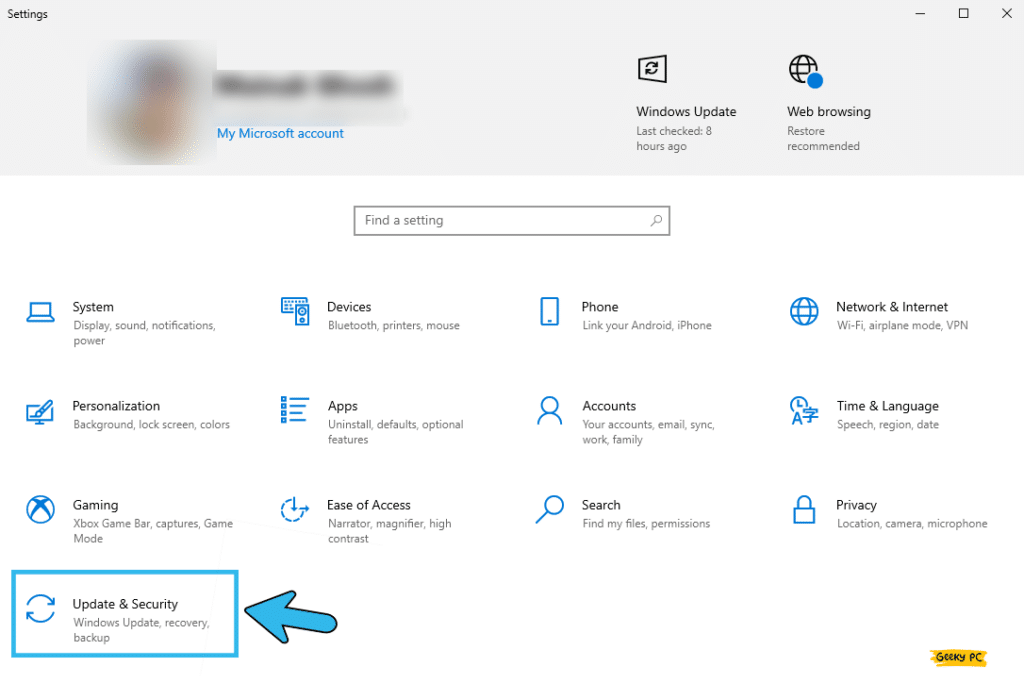
- Step 2: After the new window appears, scroll down, and click on the “Update & Security” option.
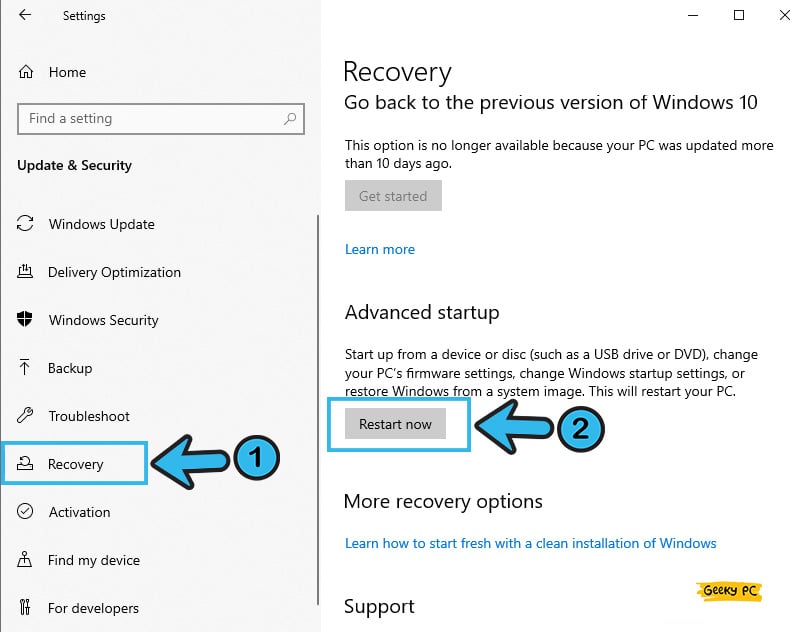
- Step 3: Once the new menu opens, navigate to the left panel, and click on the “Recovery” tab.
- Step 4: Now, navigate to the right panel, and click on the “Restart” button found under the “Advanced Startup” header.
- Step 5: Let windows automatically reboot and select the “Safe Mode” option when prompted.
- Step 6: Once the Windows OS is usefully loaded into safe mode, check the installation process again.
Several people have told us that they started getting an unresponsive taskbar once they restarted their device into safe mode.
If you are also witnessing a similar situation, you can follow our step-by-step guide to fix the unresponsive start button on Windows devices.
3. Give Your Device A Clean Boot
To give you an unmatched experience, the latest generation Windows OS starts with several startup applications. However, in a few cases, these startup applications can interfere with other processes on your system. So, it is better to give your device a clean reboot without the startup apps.
- Step 1: To launch the “Run” command, press the “Windows Key + R” buttons together.
- Step 2: Once the popup field appears, type “msconfig” and click the “OK” button.
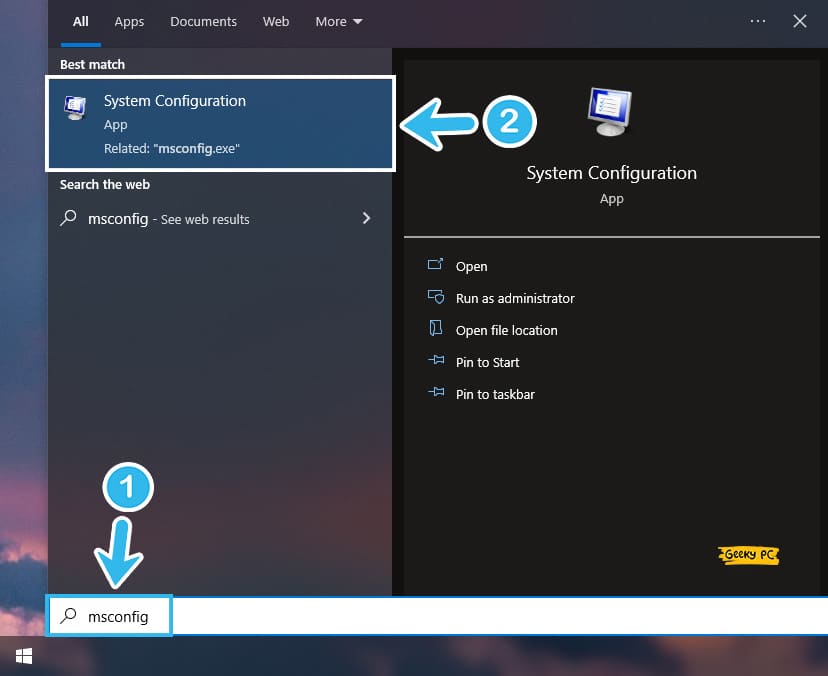
- Step 3: After the “Configuration” menu launches, select the “General” tab from the header menu.
- Step 4: Now, navigate to the “Selective Startup” menu and uncheck the box beside the “Load startup items” option.
- Step 5: Navigate to the “Service” tab from the header selection menu and tick the box beside the “Hide All Microsoft Services” option.
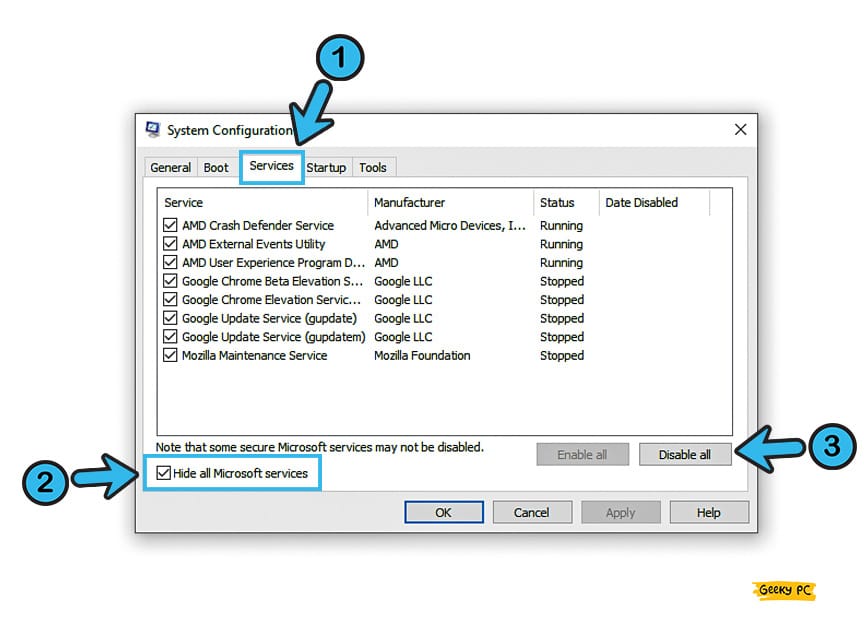
- Step 6: Once you get the complete list of startup applications, click on the “Disable All” button.
- Step 7: Now, click the “Apply” button to save the settings and then press the “OK” button to exit.
- Step 8: Reboot your device without any application and check whether the issue still appears.
4. Update Your Windows OS
Not just during installation, you may also face several other app-related issues if you are using an outdated version of Windows OS. So, before trying anything else, you need to update your Windows OS as soon as possible to resolve errors in glitches.
- Step 1: Click on the “Magnifying Glass” icon located at the bottom-left corner of your taskbar.

- Step 2: Once the search field appears, type “Windows update” and click on the first result that appears.
- Step 3: After the “Windows Update Settings” menu appears, navigate to the left panel and click on the “Windows Update” option.
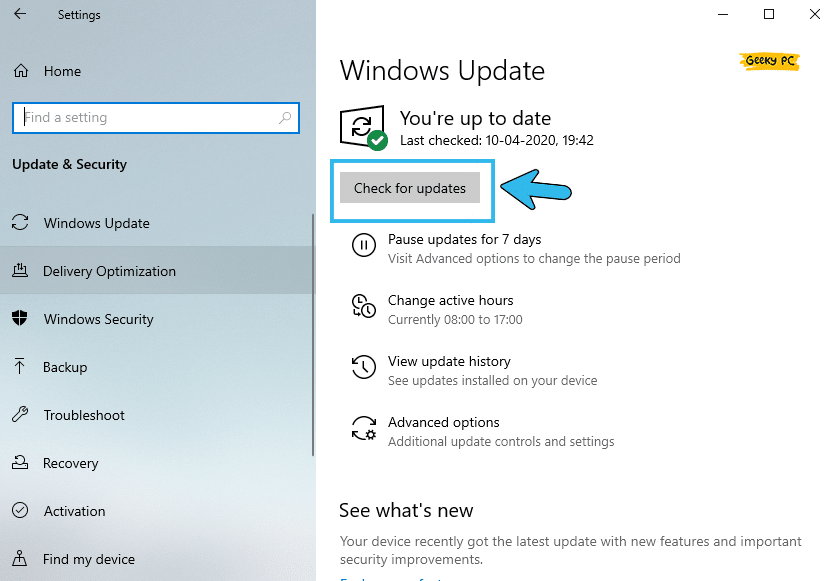
- Step 4: Now, navigate to the right panel and select the “Check for updates” option.
- Step 5: Let windows automatically check and install the latest updates.
- Step 6: Once your Windows OS is fully updated, reboot your system.
Alternatively, you can visit the download center of Microsoft and check for the latest available updates if you don’t have an active internet connection to your system. But yes, you’ll get a seamless experience if you update your OS directly with an active internet connection.
5. Update Windows Manually via Update Catalog
At times, Windows fail to get the latest update file from the server even after having an active internet connection. And that can typically trigger the error code 80070017 in Windows 10. In such cases, updating the OS from the update catalog is the only option left.
- Step 1: Once you get the installation error message on your device, note the “KB number” from the error message.
- Step 2: Now, stop the installation and open any web browser (preferably Google Chrome).
- Step 3: Visit the Windows Update Catalog website and click on the search field located at the top-right corner of the webpage.
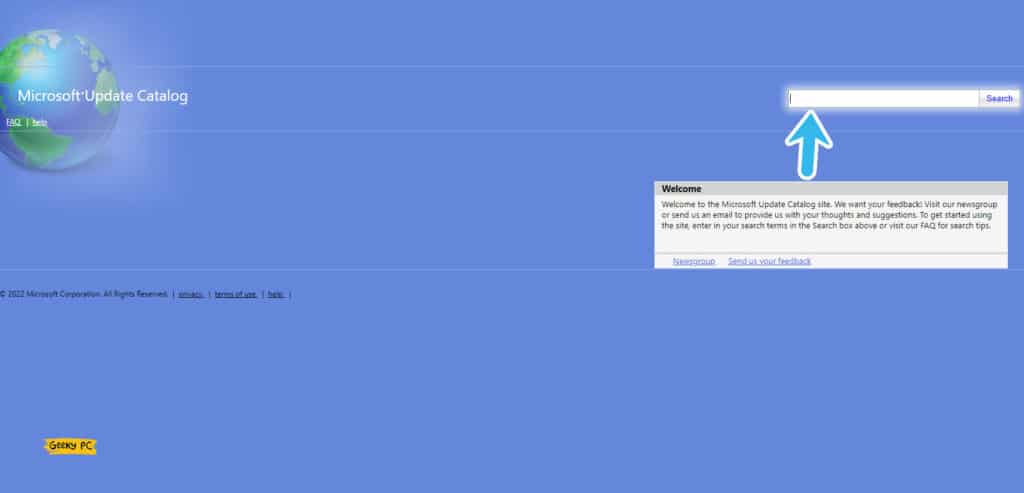
- Step 4: Paste the “KB number” in the search field, which you have already noted down, and hit the “Enter” button.
- Step 5: Once the new page appears, select the version depending on your OS architecture (32-bit or 64-bit).
- Step 6: Once the “.msu” file is downloaded to your system, double-click on the file to initiate the update process.
- Step 7: Follow the on-screen instruction to install the update and reboot your system once it is done.
6. Disable Windows Defender Temporarily
It is no doubt that Windows defender is robust security software that now comes preinstalled with the latest Windows OS. However, at times, this software can directly interfere with the installation process. In such cases, disabling it temporarily is the only option.
- Step 1: To launch the “Settings” app, press the “Windows Key + I” buttons together.
- Step 2: Scroll down to the bottom of the newly opened window and click on the “Update & Security” option.

- Step 3: After the new window opens, navigate to the left panel, and select the “Windows Security” option.
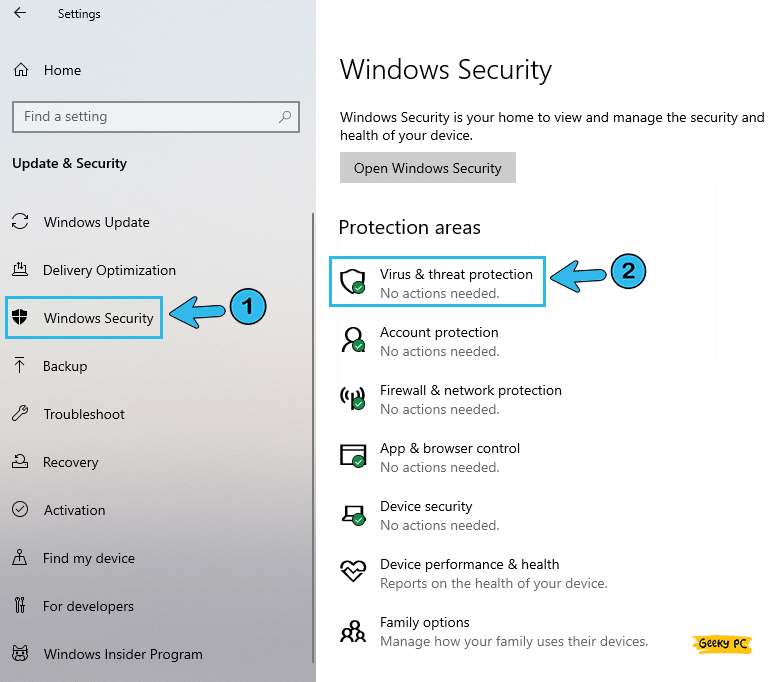
- Step 4: Now, come back to the right panel and select the “Virus & threat protection” option.
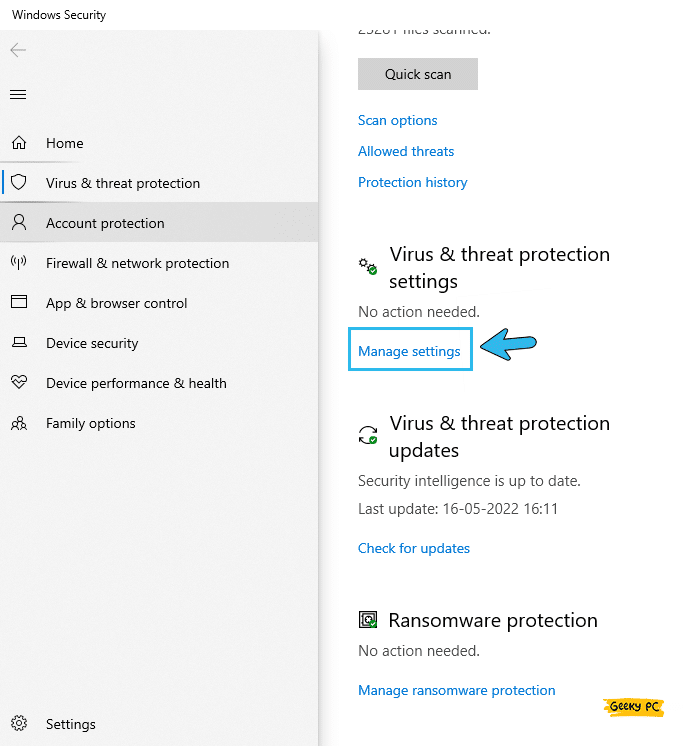
- Step 5: Once the new window appears, click on the “Virus & threat protection settings” option.
- Step 6: Navigate to the toggle switch beside the “Real-time protection” option and disable it.
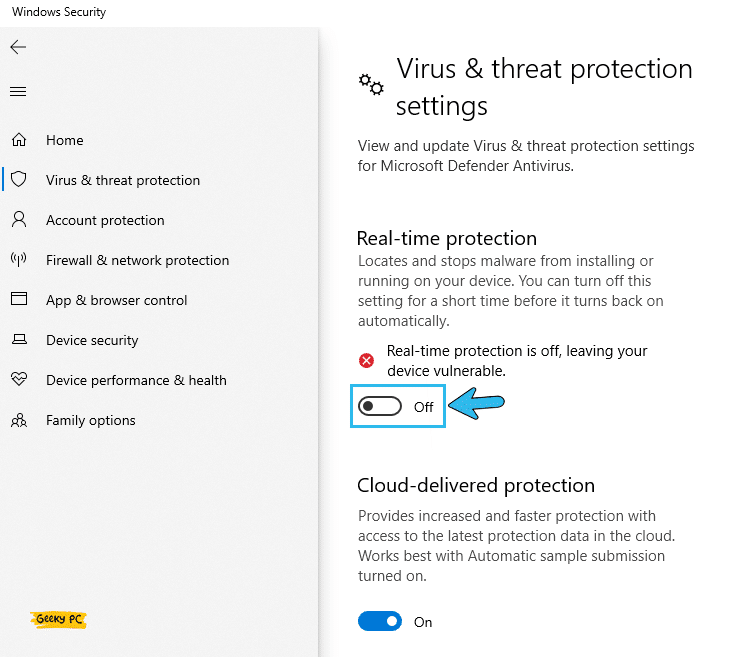
- Step 7: Click on the “OK” button to save the settings and exit the app.
Many people have started getting a group policy error once they have disabled the Windows Defender, especially while using their system under a network administrator.
If you are also facing a similar situation, follow our detailed guide to fixing the “This program is blocked by group policy” error in Windows systems.
6+ Advanced Fixes For The Error Code 0x80070017 In Windows
If the generic fixes we have mentioned above are not sufficient to resolve the Windows installation error 0x80070017, your problem may be deeply rooted.
However, you can quickly resolve it with the advanced tweaks we have mentioned below.
7. Run Windows Update Troubleshooter
A dedicated troubleshooting option now comes preinstalled with the latest Windows OS, especially with Windows 10 and 11. And if the installation error is frequently occurring on your system, you should run the troubleshooter to resolve it.
- Step 1: Click on either the “Windows” or the “Start” button, depending on your Windows OS.
- Step 2: Now, click on the “Gear” icon to launch the “Settings” app.
- Step 3: Once the app launches, scroll down, and select the “Update & Security” option.

- Step 4: Now, navigate to the left panel and select the “Troubleshoot” option.
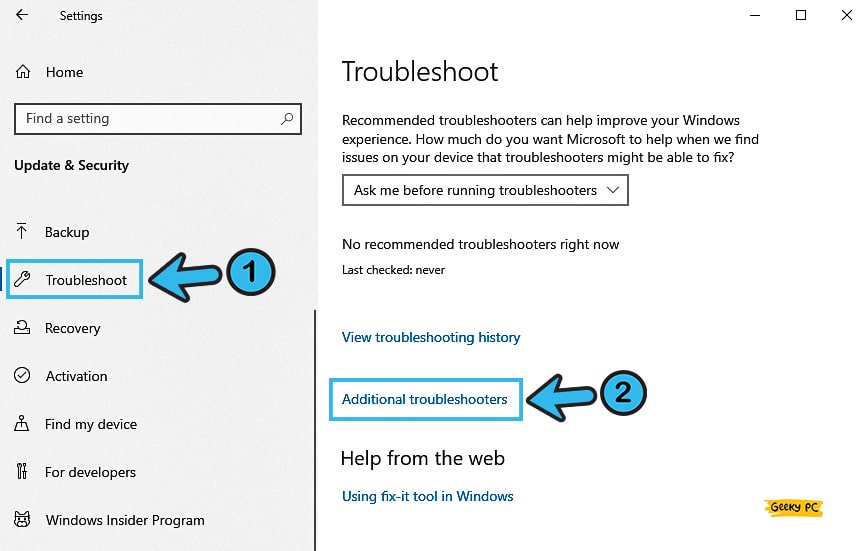
- Step 5: Navigate to the right panel and select the “Additional Troubleshooter” option.
- Step 6: After the new window launches, navigate to the “Additional Troubleshooter” option and click on the “Windows Update” button.
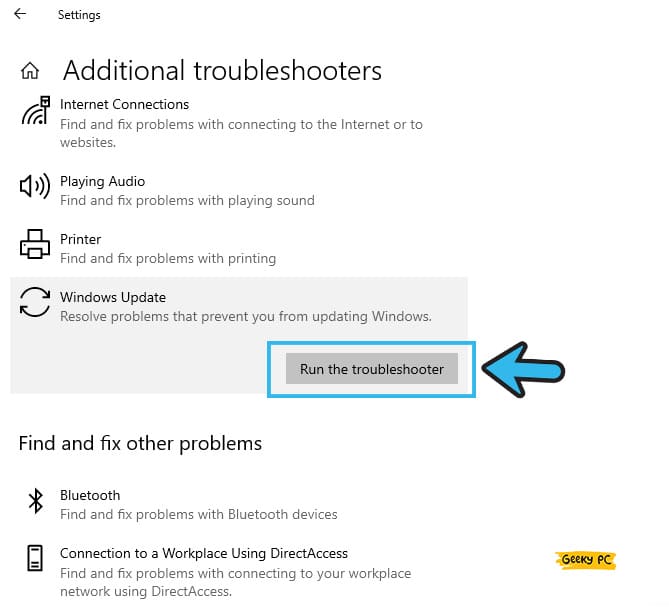
- Step 7: Follow the on-screen instruction to accomplish troubleshooting.
- Step 8: Reboot your system when the troubleshooting is completed and check whether you are still getting the same issue.
While troubleshooting, Windows will automatically search and download necessary files and directories to make your system error-free.
And for that, you need to have an active internet connection on your system. Besides, it is also better to disable your antivirus beforehand.
8. Run SFC Scan
System File Checker or SFC now comes preinstalled with the latest version of Windows OS, especially with Windows 10 and 11. This tool is highly efficient in resolving the windows installation error in no time, as it checks and rectifies the errors and glitches from the root directories.
- Step 1: Press the “Windows Key + R” buttons together to initiate the “Run” command.
- Step 2: After the command field appears, type “CMD” and click on the “OK” button.
- Step 3: Once the black windows of the “Command Prompt” app launch, type “sfc /scannow” and hit the “Enter” button.

- Step 4: Let SFC search and fix the errors and glitches on your root directories.
- Step 5: Once the operation is done, type “Exit” to close the “Command Prompt” app.
- Step 6: Now, reboot your system and proceed with the installation again.
9. Execute DISM Command
Other than SFC, there is another tool called DISM that comes preinstalled with the latest Windows OS. And this tool is really efficient in resolving installation-related errors on your system. So, you need to run it with administrative privilege to fix the glitches on your system.
- Step 1: To launch the “Run” command, press the “Windows Key + R” buttons together.
- Step 2: Once the run command field appears, type “CMD” and click on the “OK” button.
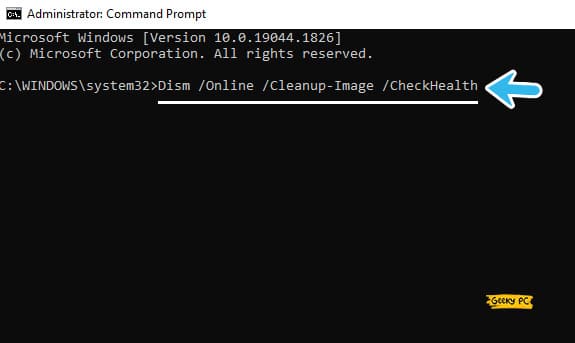
- Step 3: After the black “Command Prompt” window launches, type the “Dism /Online /Cleanup-Image /CheckHealth” command and hit the “Enter” button.
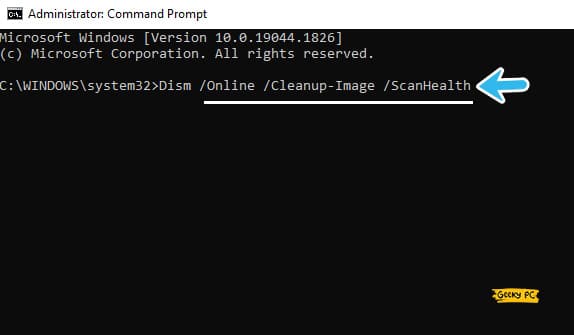
- Step 4: Now, type the “Dism /Online /Cleanup-Image /ScanHealth” command and hit the “Enter” button again.
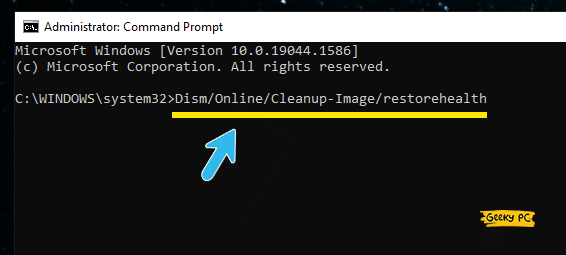
- Step 5: Finally, type the “DISM.exe /Online /Cleanup-image /Restorehealth” command and hit enter.
- Step 6: Once all three operations are over, type “Exit” to close the “Command Prompt” window.
- Step 7: Now, reboot your system and proceed with the installation again.
It is always better to disable your antivirus beforehand before you proceed with the DISM tool. Otherwise, the security software will restrict the DISM tool from searching and performing operations in the root directories.
Besides the antivirus, you should also disable your firewall temporarily.
10. Restart All The Windows Update Services
You may not know, but the “Windows Update Service” constantly runs in your background to give you a seamless experience. However, at times, this process may start working maliciously. And in such cases, you need to manually restart the windows update service to repair the glitch.
- Step 1: Press the “Windows Key + R” buttons together to initiate the “Run” command.
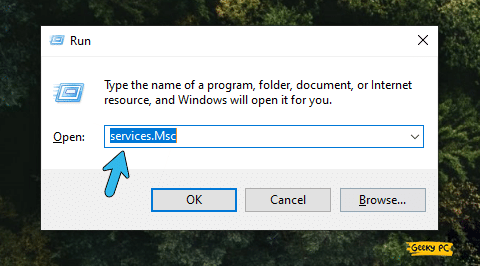
- Step 2: Once the run field appears, type “services.msc” and click the “OK” button.
- Step 3: Once the “Services” app launches, navigate to the left panel and select the “Services (Local)” option.
- Step 4: Navigate to the right panel and select the “Background Intelligent Transfer Service” option.
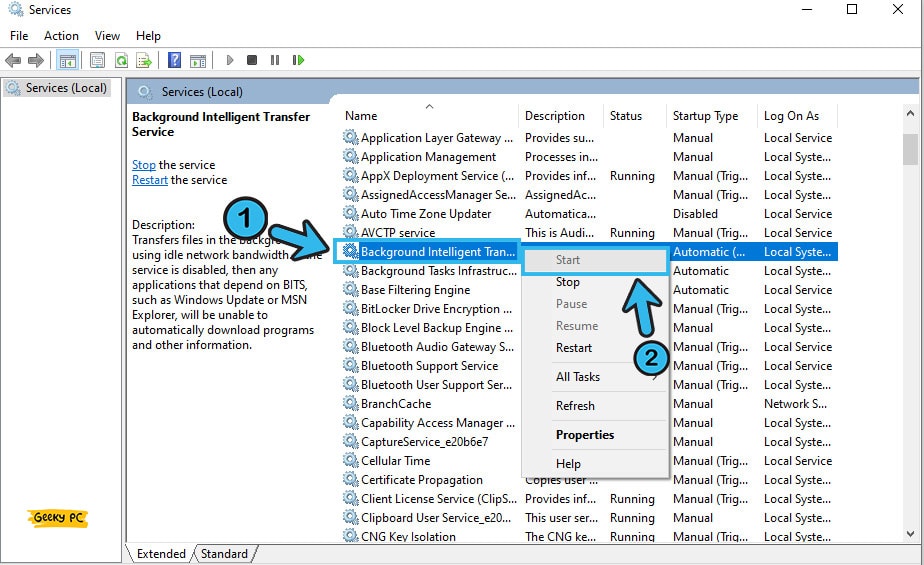
- Step 5: Now, if the service is already stopped, right-click to fetch the menu and click on the “Start” option.
- Step 6: If the update service is running, right-click to bring the menu and select the “Restart” option.
- Step 7: After the Windows update service is fully restarted, exit from the app.
- Step 8: Now, check the installation process again to know if the problem is still triggering or not.
Several users have reported getting an undefined network once they have stopped and restarted the Windows update process.
11. Completely Reset Windows Update Components
Not just the update service, there are many other update components that run silently in the background. And if you have any issue with those components, you can get the 0x80070017 error code in Windows OS. However, you can easily resolve it.
- Step 1: To initiate the “Run” command, press the “Windows Key + R” buttons together.
- Step 2: Once the run command field appears, type “CMD” and press the “OK” button.
- Step 3: After the black Command Prompt window appears, type the following command and hit the “Enter” button after each line; “net stop wuauserv,” “net stop cryptSvc,” “net stop bits,” and “net stop msiserver.”
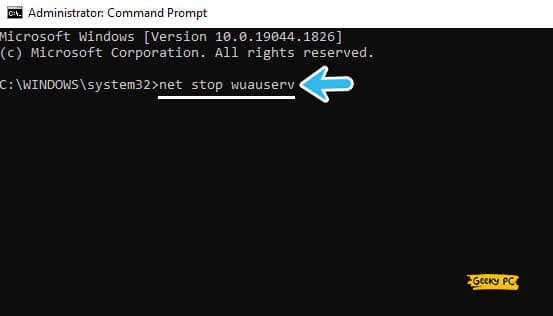
- Step 4: Now, to rename the “SoftwareDistribution” folder, type the “ren C:\Windows\SoftwareDistribution SoftwareDistribution.old” command, and hit the “Enter” button.
- Step 5: Type “ren C:WindowsSystem32catroot2 Catroot2.old” and hit the “Enter” button again to rename the “Catroot2” folder.
- Step 6: Type the following commands and hit the “Enter” button after each line; “net start wuauserv,” “net start cryptSvc,” “net start bits,” and “net start msiserver.”
- Step 7: Once all the operations are executed, type “Exit” to close the “Command Prompt” window.
- Step 8: Now, try to proceed with the installation process again to check whether the problem still arises.
It is better to perform these commands under an expert guide. Because if you type any wrong command or put different values, it will instantly affect your root directory, which will create multiple problems in a cycle. So, execute this step with extreme precaution.
12. Create A Fresh ISO File And Install OS
At times, you can’t resolve the bugs and glitches on the installation files of your Windows OS for various reasons. It can even occur if a virus has already infected the root directories. However, you can easily create a new ISO file and proceed with the fresh installation.
- Step 1: Visit the official Microsoft website to download the “Media Creation Tool” on your system.
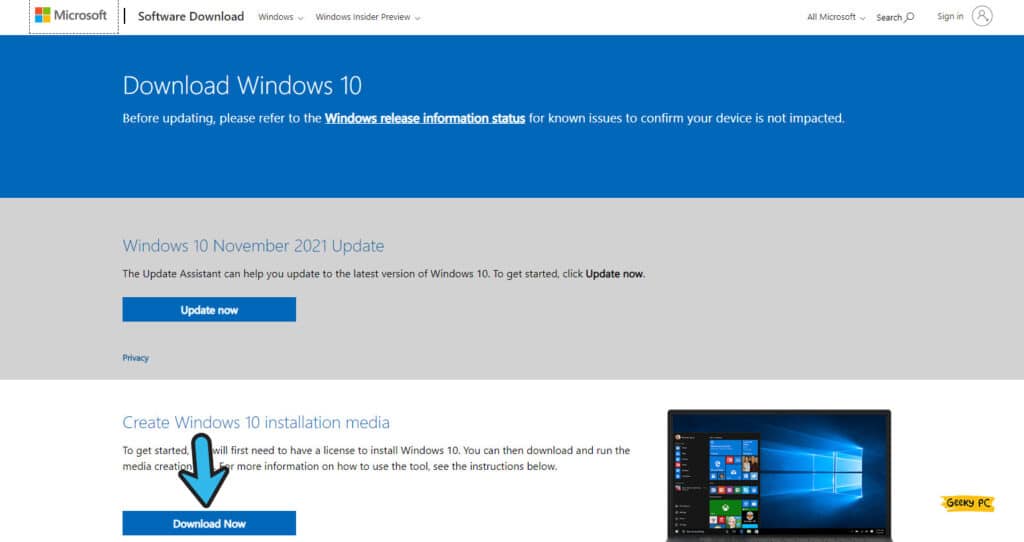
- Step 2: Once the webpage loads, click on the “Download Tool Now” button.
- Step 3: Once the “.exe” is downloaded on your system, double-click on the setup files to launch it.
- Step 4: If you get an on-screen prompt, click on the “Yes” button to allow access.
- Step 5: Now, insert a bootable USB drive on your device and select the “Create installation media (USB flash drive, DVD, or ISO file) For another PC” option.
- Step 6: Once you get a new prompt, click on the “Next” button.
- Step 7: Now, select the preferred “Language,” “Architecture,” and “Edition” from the setup page, and click on the “Next” button.
- Step 8: Select the “ISO File” option from the menu and click on the “Next” button again to create the installation file.
- Step 9: Now, remove and re-insert the bootable drive into your system and restart your device.
- Step 10: Once you get a new prompt in the startup window, select the “Reinstall” button.
Many people have reported getting a generic PnP monitor error once they have installed the OS through a new ISO file. If you are also encountering similar issues on your system, follow our comprehensive guide to fixing the generic PnP monitor error in Windows devices.
Conclusion
It is a perfectly safe option to try the generic methods we have listed above to resolve the installation error in Windows systems, as these generic fixes alone are sufficient to fix it in most cases. However, if you have to try the advanced fixes, it is better to create a restore point beforehand.
So, that’s all the possible solutions we have for the Windows installation error 0x80070017. If you think we have missed any, or if you have any working solution for this error, feel free to drop your suggestion and feedback in the comment box below.
FAQs
Q. How do you fix the Windows installation error?
First, make sure that you have sufficient disk space on your device, and run the Windows installer a couple of times after disabling your antivirus. You can also unplug all the newly installed hardware on your system and then run the Windows update troubleshooter to fix this issue.
Q. Why has my Windows 10 installation failed?
You are probably getting this error as the Windows installer fails to copy or access the actual installation file, primarily due to a corrupted directory. Your antivirus and firewall can also sometimes interfere with the installer, which can trigger this issue as well.
Q. What causes the error code 0x80070017 to trigger?
The primary reason for error code 0x80070017 is bad sectors in your HDD that make the installation file inaccessible. Besides, it may also happen that the firewall or antivirus installed on your system is interfering with the installation process. If you have any bugs in the Windows update component, this issue can still trigger.
Q. Can you update your OS after getting the 0x80070017 error code?
Yes, you can surely update your OS manually even after getting the error code 0x80070017 during the installation process. And to do that, you need to note down the KB number and then search that particular file on the Microsoft update catalog. Once it is downloaded, you can directly update your OS with that file.



Leave a Reply
View Comments