It is pretty annoying when all of a sudden, Windows fails to detect your monitor and starts displaying generic PnP monitor error, especially when playing games or doing any serious work. However, there are some easy methods by which you can effectively resolve this error.
You can fix the generic monitor just by replacing the connecting cables. Besides you should also update your Windows OS, your monitor driver, and the GPU driver. Many people have also resolved it by running the hardware troubleshooter. However, the SFC scan is also an effective method.
These are not all the solutions we have for this issue. But, before we dive deep into the problem, let’s understand what this error actually is and what are the causes that trigger it in no time.
What Is A Generic PnP Monitor?
Get this thing first; a generic PnP monitor is not actually a type of monitor but a detection issue instead. You should not consider it a cheap monitor if it displays this error, as many high-end monitors are also prone to it.
If your windows can’t identify the maker or the model number, it will start showing it as a generic one.
So, this error is a warning that your windows fail to rightly detect your monitor. If you get any driver software with your monitor (especially with the high-end or gaming one), install it properly, and your windows can detect it afterward.
What Are The Root Causes Of Generic PnP Monitor Error?
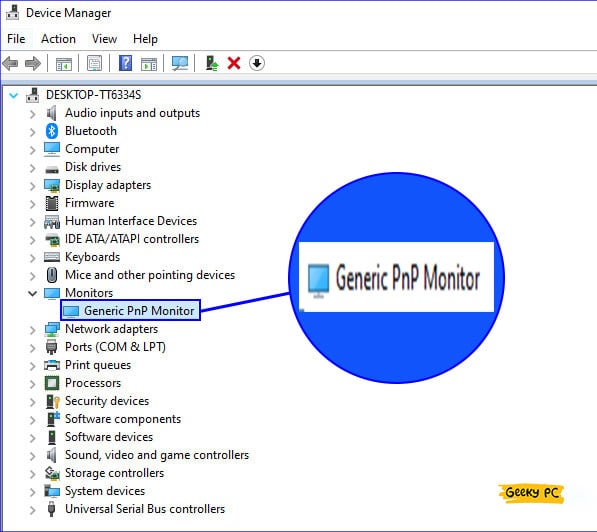
Although generic PnP monitor issues are common these days, various causes can trigger them. However, considering a broader spectrum, this particular monitor-related issue can typically trigger for six main reasons.
- Your monitor or the connection cable is broken and needs urgent replacement.
- You are using a VGA cable that is not optimally supported by your graphics card.
- The windows or the monitor driver are obsolete and need an update.
- Your GPU driver is unsupported by your Windows OS and needs an update.
- Any startup program or app is interfering with your graphics properties.
- There are issues with your root directory and setup files.
Besides these six, this monitor error can also trigger if you are using a low-end monitor with a below-par refresh rate and resolution. Besides, it can even trigger if the resolution and the refresh rate are different on your monitor and GPU.
5+ Easy Fixes For The Generic PnP Monitor Error
Before you resort to any pro methods and advanced system tweaks to fix the generic PnP monitor problem on your Windows devices, you should start by following some generic methods.
And in more than 80% of cases, these generic methods alone are sufficient to resolve this error.
1. Reconnect Monitor
If you keep getting graphics issues and bugs while using a generic PnP 144hz monitor, the problem may be triggering from not the monitor but the monitor connections.
This error can also trigger if you have any loose connection on the monitor. However, reconnecting the monitor again can effectively resolve this.
- Step 1: Shut down your system and switch off your monitor.
- Step 2: Remove both the graphics and the power cord from the monitor as well as from your CPU.
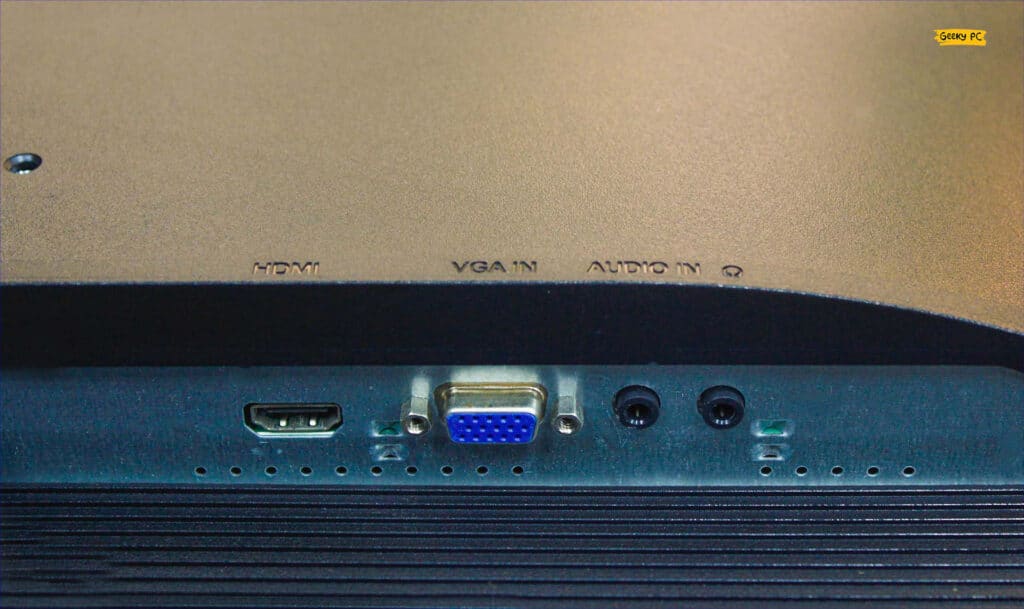
- Step 3: Wait for at least five minutes after removing all your cords from the monitor.
- Step 4: Securely re-plug the connection cables on both the CPU and monitor.
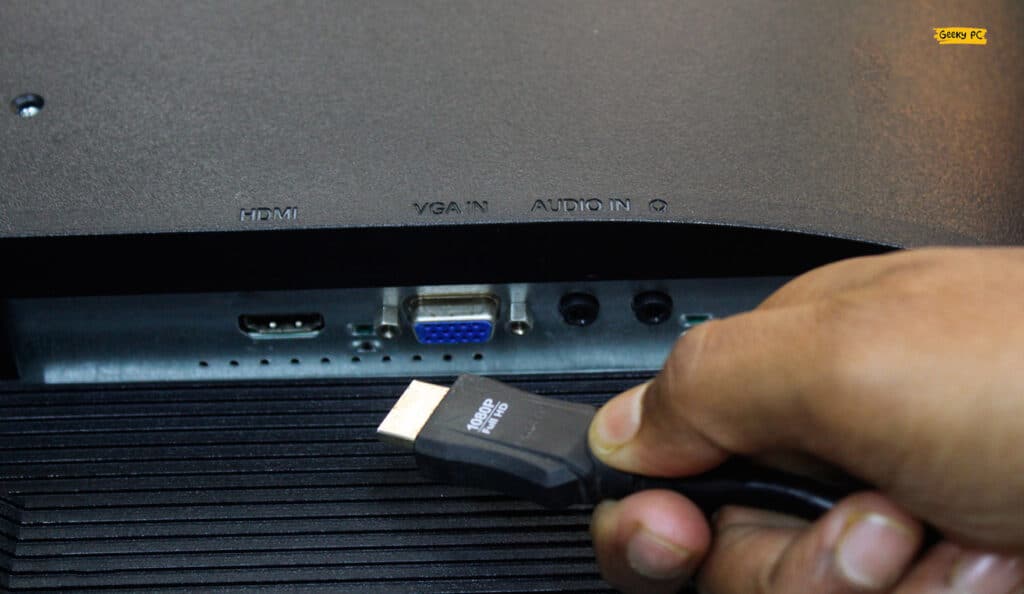
- Step 5: Reboot your system and check if the bug still arrives.
If you are using a VGA cable on your monitor, you need to unscrew it from your CPU and monitor and remove it.
Besides, you should also keep a soft hand while removing your cables. Otherwise, you may further damage the connecting cables.
2. Replace Connecting Cables
Many people have reported getting this generic monitor issue while using a broken connecting cable on their monitor.
So, you need to manually check all your connecting cables to trace any signs of wear and tear. And if you can identify any, replace your cord with a new one.
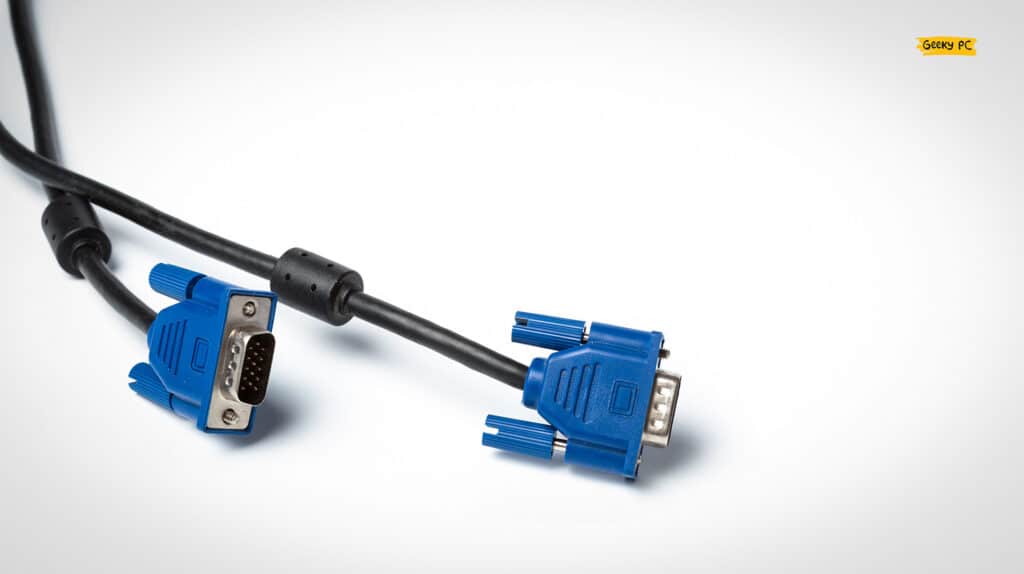
- Step 1: Remove the connecting cables (unscrew them first if you use a VGA cable) from your monitor and CPU.
- Step 2: Thoroughly check whether the cable has any signs of wear and tear.
- Step 3: If you find any, buy a new compatible cable and tightly secure it on both your system and monitor.
- Step 4: Switch on your computer and check if the monitor performs well with the new cable.
If you are still using the old-school VGA cables that come with screws on both sides, it is time to replace them with either an HDMI or a DVI cable. These cables not only assure secured connection but also makes the display brighter and more vivid for a better viewing experience.
If you also getting the same type of problem, follow our detailed guide to Fix Green Pixels On Monitor error in windows devices.
3. Remove And Reconnect Your Graphics Card
Not just the connecting cables but your graphics card can also trigger various issues on your display if it has loose connections.
So, you also need to check whether the GPU is tightly and securely plugged in on your motherboard to establish a proper graphics connection.
- Step 1: Unscrew and remove the side panel of your cabinet (you may need to slide it to open).
- Step 2: Unscrew the graphics card from the back panel to remove it.
- Step 3: Firmly pull off the graphics card from your motherboard and check whether it has any sign of physical damage.
- Step 4: Go for thorough cleaning of your GPU with a cold blower to remove all the dust.
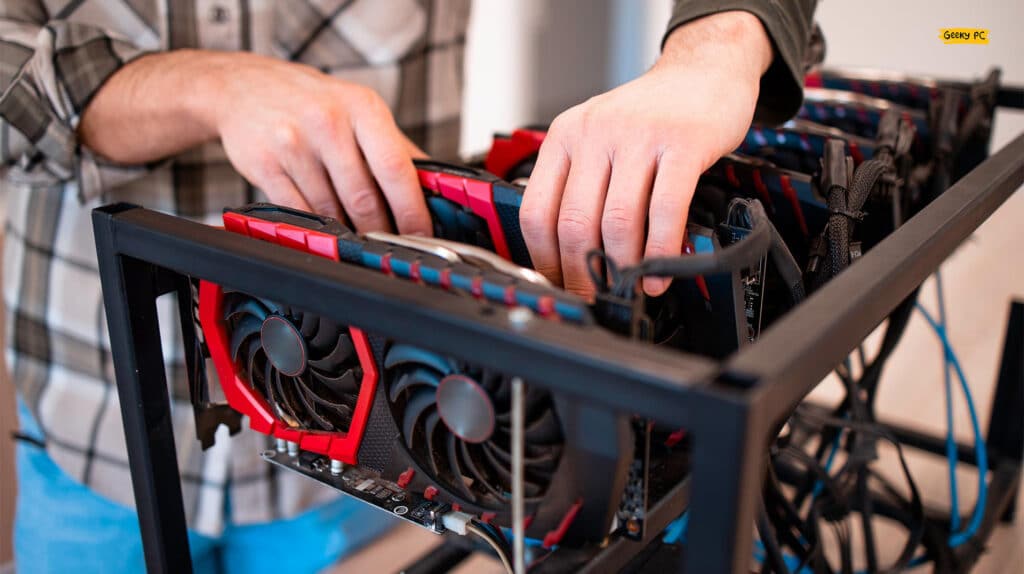
- Step 5: Re-plug your GPU into the right slot on your motherboard and tightly secure the screws on the back panel.
- Step 6: Close the side panel of your cabinet, connect all the cables, and boot up your system.
You need to keep a gentle hand while removing the GPU from the motherboard. If you apply too much pressure, the delicate pins on the GPU can damage or even break.
You should also check the right alignment of the GPU before inserting it into the slot.
4. Restart Your Device In Safe Mode
If you are getting the generic PnP monitor error in your laptop, there is no way to remove the graphics card and the connecting cables and check whether the issue is triggering from those.
However, you can restart your device in safe mode to check if the error occurs due to any interfering app.
- Step 1: To launch the “Settings” app, press the “Windows Key + I” buttons together.
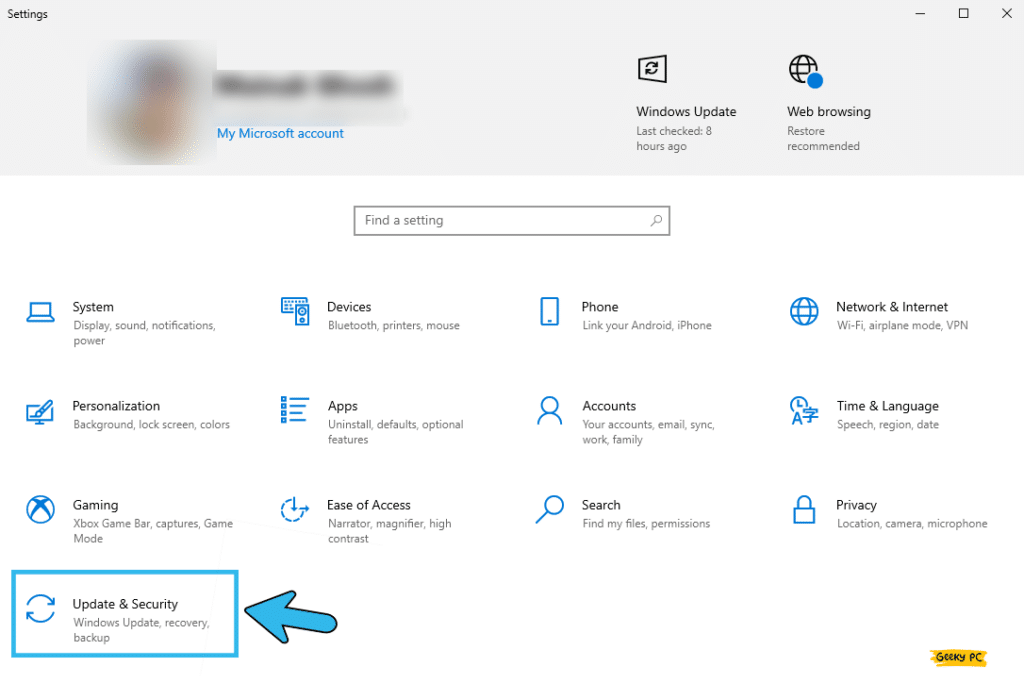
- Step 2: Once the “Settings” app launches, scroll down the window and click on the “Update & Security” option.
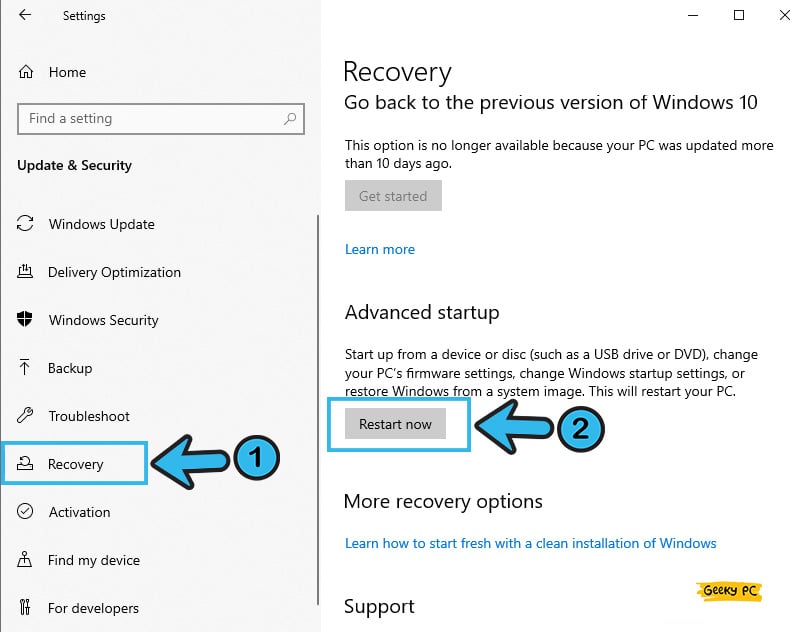
- Step 3: Once the new window appears, click on the “Recovery” button on the left panel.
- Step 4: Now, click on the “Restart” button in the right panel under the “Advanced Startup” header.
- Step 5: Let Windows automatically restart and choose the “Safe Mode” option when the new prompt appears.
- Step 6: Check whether the graphics issue still appears after the window boot-up in safe mode.
Many people started to get group policy errors after restarting their systems into safe mode, especially if they were using the system under a network administrator.
In such cases, follow our step-by-step guide to fix the “This program is blocked by group policy” error on Windows devices.
5. Clean Reboot Your System
At times, it may happen that any startup program is interfering with the graphics driver to trigger the generic monitor error in Windows devices.
So, it is better to disable all the startup programs and give your system a clean reboot to fix the generic PnP monitor in Windows 10.
- Step 1: Press the “Windows Key + R” buttons together to launch the “Run” command.
- Step 2: Once the popup window appears, type “msconfig” and press the “OK” button.

- Step 3: After the configuration window launches, navigate to the “General” tab from the header options.
- Step 4: Now, navigate to the “Selective Startup” option and tick the box beside it.
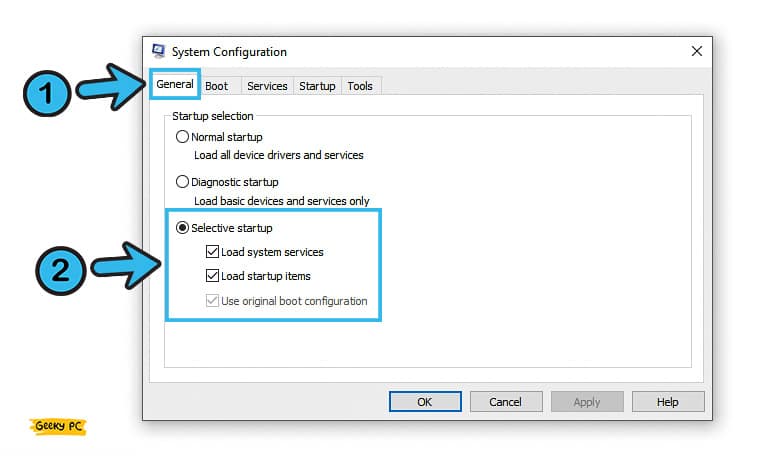
- Step 5: Under the “Selective Startup” header, uncheck the box beside the “Load Startup Items” option.
- Step 6: Navigate to the “Service” tab from the header options and tick the box beside the “Hide all Microsoft services” option.
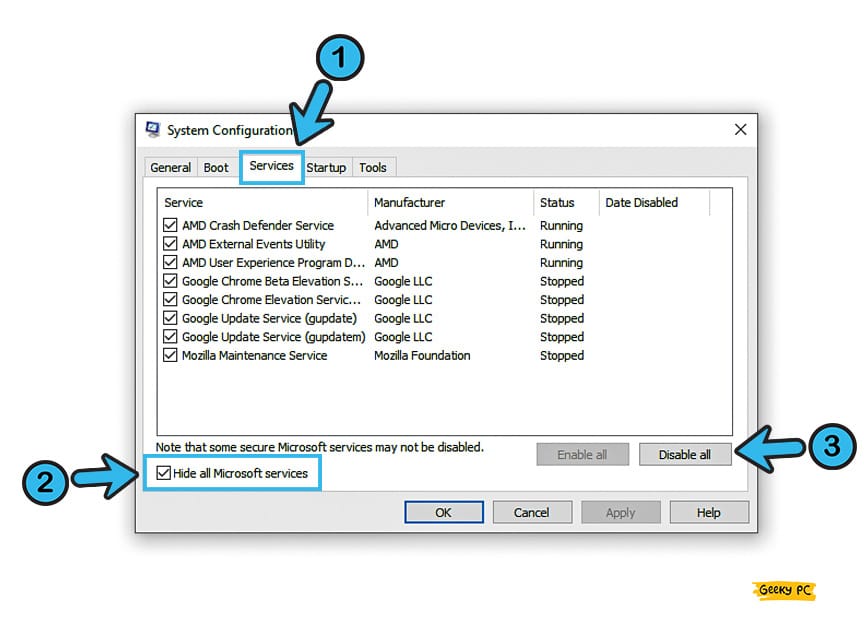
- Step 7: To disable all the third-party startup apps, click on the “Disable All” button.
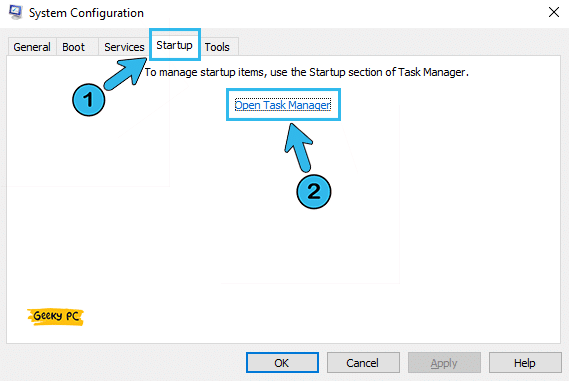
- Step 8: Navigate to the “Startup” tab from the header and select the “Open Task Manager” option.
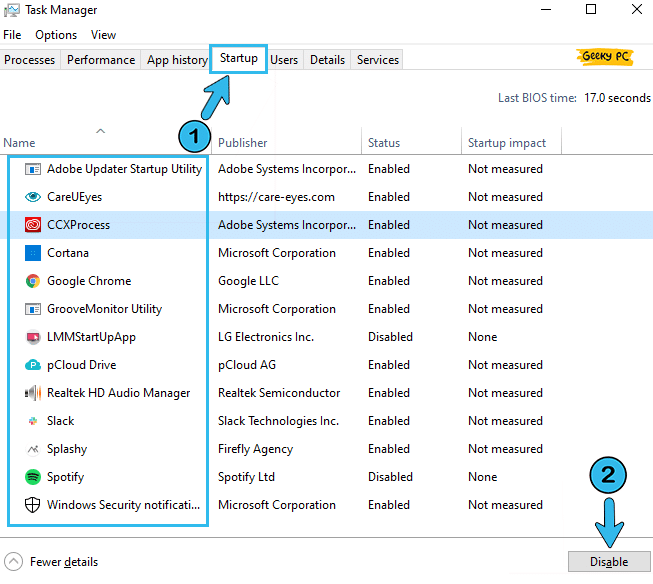
- Step 9: Once the “Task Manager” window appears, right-click on each item and select the “Disable” option.
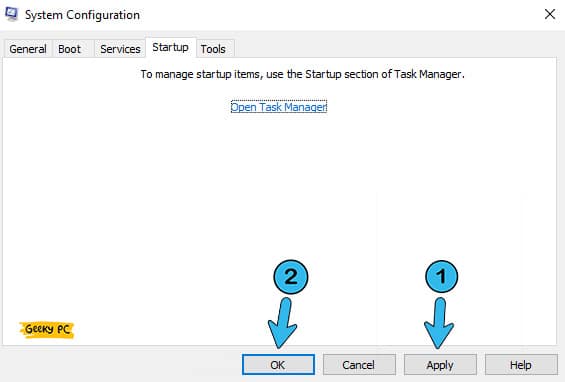
- Step 10: Click the “OK” button to save the settings and give your system a fresh reboot.
Many people have started getting an undefined ethernet error with a yellow triangle after they have disabled the startup programs in Windows 10.
7+ Advanced Fixes For The Generic PnP Monitor Bug
If the generic PnP monitor issues are not solved even after trying all the generic methods we have listed above, your problem seems to be way more deep-rooted than you can possibly assume.
In such cases, resorting to the advanced techniques that need severe tweaks for your system will be the only option left.
6. Troubleshoot Your Hardware And Devices
Not just the monitor or the graphics card, the generic PnP error can still trigger if you have any issues with other hardware and peripherals.
So, if the error keeps coming back after you try all the generic methods, you should troubleshoot your hardware and device first.
- Step 1: To launch the “Settings” app, press the “Windows Key + I” buttons together.
- Step 2: Once the new window appears, scroll down the page, and click on the “Update & Security” option.
- Step 3: Navigate to the left column on the new window and select the “Troubleshoot” option.
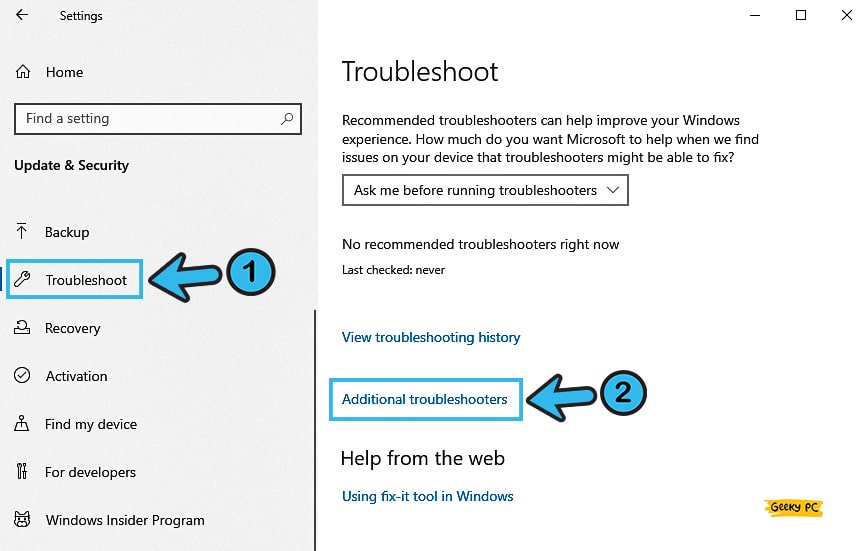
- Step 4: Now, come to the right panel and click on the “Additional Troubleshooter” option.
- Step 5: Once the new window launches, navigate to the “Video Playback” option.
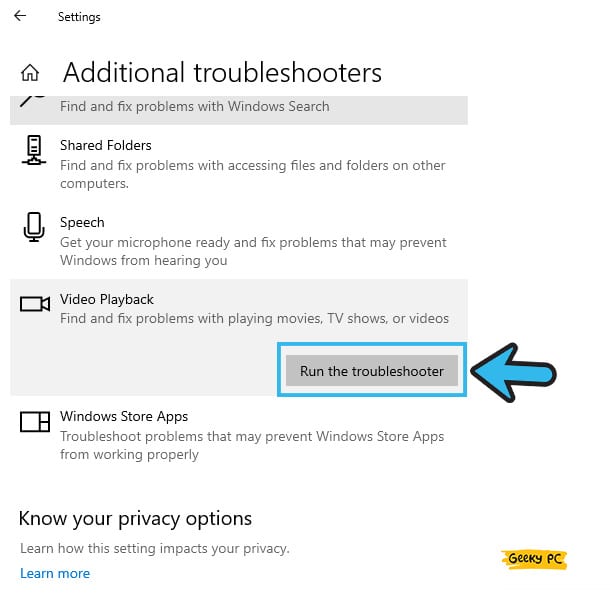
- Step 6: Let windows troubleshoot the hardware, rectify it, and reboot your system once the operation is done.
Many people have reported getting a DISM error, especially the error code 87, after troubleshooting their device.
If you are also encountering a similar situation, just follow our comprehensive guide to fixing the DISM error code 87 in windows devices.
7. Uninstall Generic PnP Monitor Driver
It is highly possible that the monitor driver installed on your system is corrupt or has any bug in it that triggers the generic PnP error.
However, you can quickly reset it by uninstalling the monitor driver completely. But don’t worry, as Windows will still detect the monitor as new hardware.
- Step 1: Right-click on either the “Start” button or the “Windows” icon on your taskbar (depending on your OS variant).
- Step 2: Select the “Device Manager” option from the list to launch it.

- Step 3: Once the app launches, navigate to the “Monitor” option, and click to expand it.
- Step 4: Navigate to the “Generic PnP monitor” option from the menu, right-click to launch the options, and select the “Uninstall Device” option.
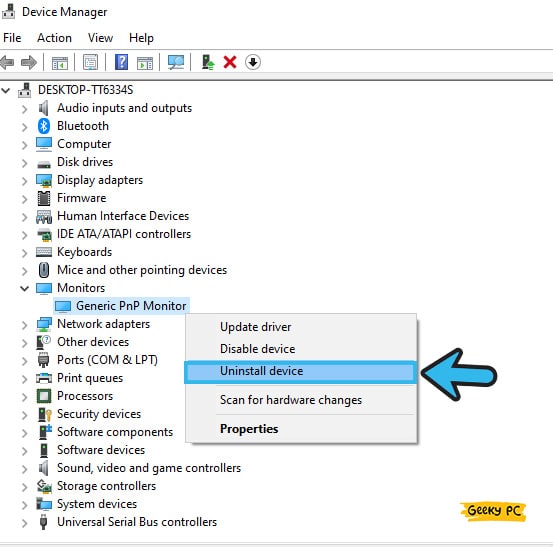
- Step 5: Select the “Uninstall” option again when the new prompt appears.
- Step 6: Reboot your system when it is completely uninstalled, and windows will automatically detect the monitor as new hardware.
8. Roll Back To The Previous Driver
If you are not ready to uninstall the generic driver from your system, you can alternatively just roll out to any previous version of the monitor driver to check whether the issue is with the latest driver.
And you can roll back to an earlier version in a few simple steps on windows.
- Step 1: Right-click on the “Windows” icon located at the bottom-left corner of your taskbar.
- Step 2: Once the new menu launches, click on the “Device Manager” option to initiate the app.
- Step 3: After the new window appears, click on the “Monitor” option to expand it.
- Step 4: Navigate to the “Generic PnP Driver” and right-click to fetch the menu.
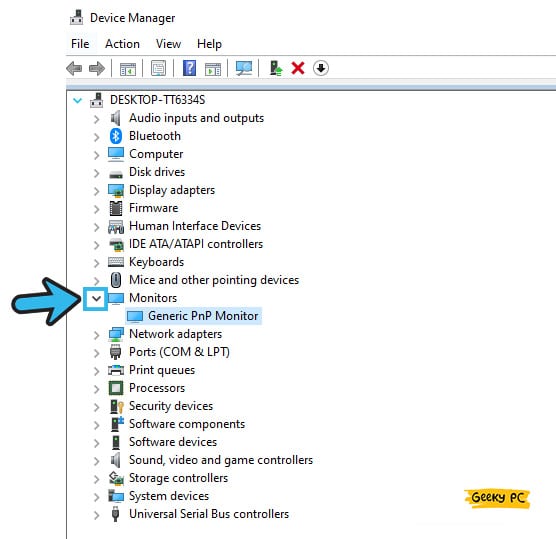
- Step 5: Select the “Properties” option from the menu.
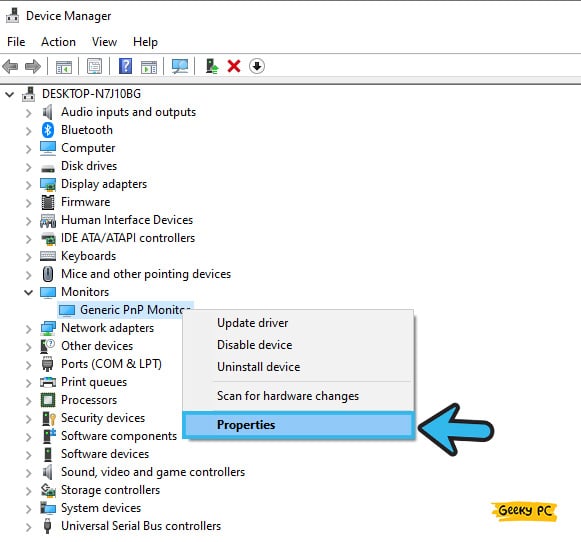
- Step 6: Once the new popup window appears, navigate to the “Driver” tab from the header menu.
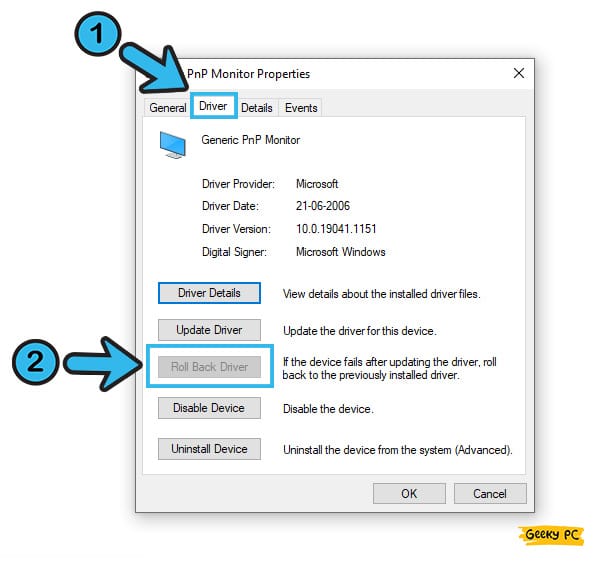
- Step 7: Now, click on the “Roll Back Driver” option and select the “Yes” option when a new prompt appears.
- Step 8: Once the driver is successfully rolled back, reboot your system and check whether the problem is still there.
Many people have started getting an unknown 0x80070017 error after rolling back to the generic PnP monitor driver in Windows 11. If you are also facing the same, follow our step-by-step guide to fix the 0x80070017 error in Windows devices.
9. Update Generic PnP Monitor Driver
If rolling back to the last-updated driver can’t solve the issue, you need to proceed with the generic PnP monitor driver download to fix it.
And to do that, you need to update the monitor drivers altogether to initiate your system again with an updated driver.
- Step 1: Press the “Windows Key + X” buttons together to launch the additional menu.
- Step 2: Select the “Device Manager” option to launch the app.
- Step 3: Once the new window appears, click on the “Monitor” option to expand it.
- Step 4: Now, navigate to the “Generic PnP Monitor,” right-click on launch the menu, and select the “Update Driver” option.
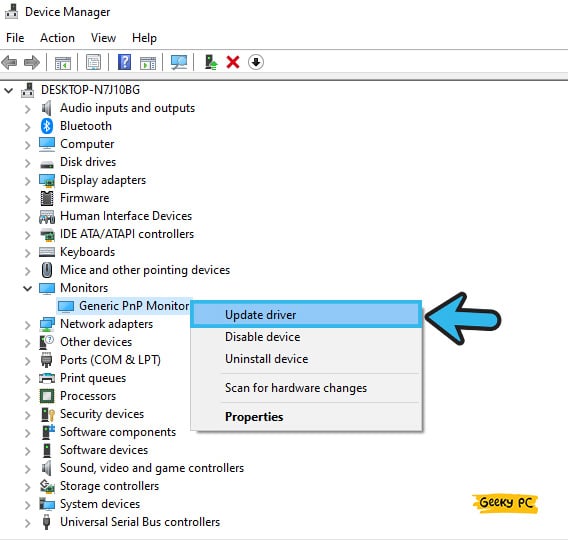
- Step 5: Once the new popup window launches, select the “Search automatically for drivers” option.
- Step 6: Let windows find the right driver on the internet and install it.
- Step 7: Restart your system when your monitor driver is fully updated.
But, after the automatic update method, if you get the “best driver is already installed” message, you need to search for it manually. To do that,
- Take a look at your Monitor Brand & Model Name.
- Note down that & google it with Driver. You might see some websites providing drivers with your monitor model, But I always prefer to monitor official manufacturing sites.
- Now download the exact, updated monitor driver for windows. Unzip it & place it somewhere.
- Again as previously, click on “Update Driver” & go to “Browse my computer for drivers.”
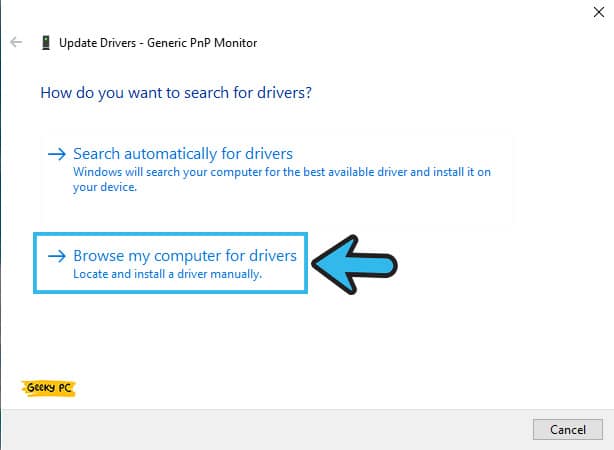
- Browse the download & unzip driver folder, and select it. Go ahead to the Next button.
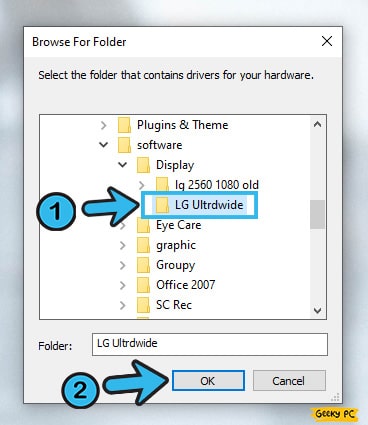
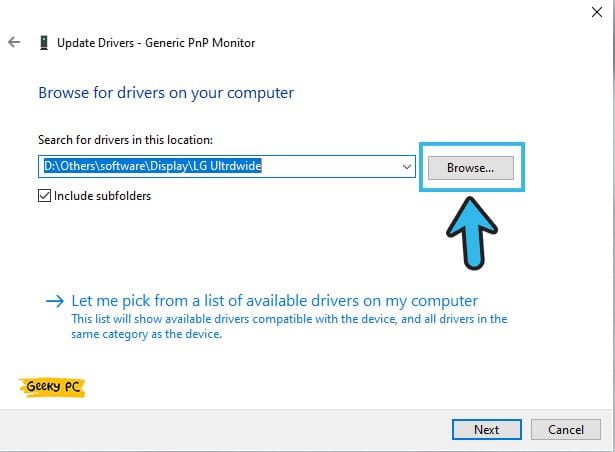
- Finally, if your driver is right, you’ll see a “Successfully installed window driver” message. If not, something is wrong with your driver.
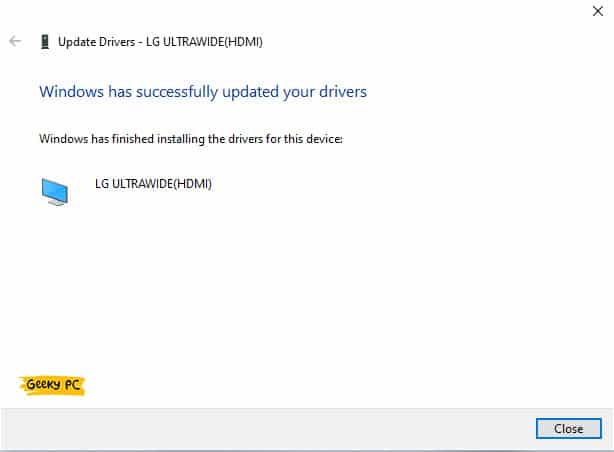
If Windows fails to search for the correct driver from the internet, you can alternatively choose the “Browse my computer for drivers” option on the fifth step.
You need to then select the “Let me pick from a list of device drivers on my computer” option and tick the box beside the “Show compatible hardware” tab. In the final step, select any driver other than the generic one to proceed with the driver installation.
10. Update Your Graphics Card Driver
Updating the monitor driver or rolling back to the previous driver option will not solve the monitor issue in a few cases. However, you need to update your GPU driver as well to fix this issue.
Note: Updating the monitor and the GPU driver in a timely manner solves monitor-related bugs and fixes minor glitches in the graphics.
- Step 1: Right-click on either the “Windows” icon or the “Start” button located at the bottom-left corner of your taskbar.
- Step 2: Select the “Device Manager” option from the list to launch the app.
- Step 3: Once the new window appears, click on the “Display Adapter” tab to expand it.
- Step 4: Now, navigate to your GPU driver and right-click to open the additional menu.
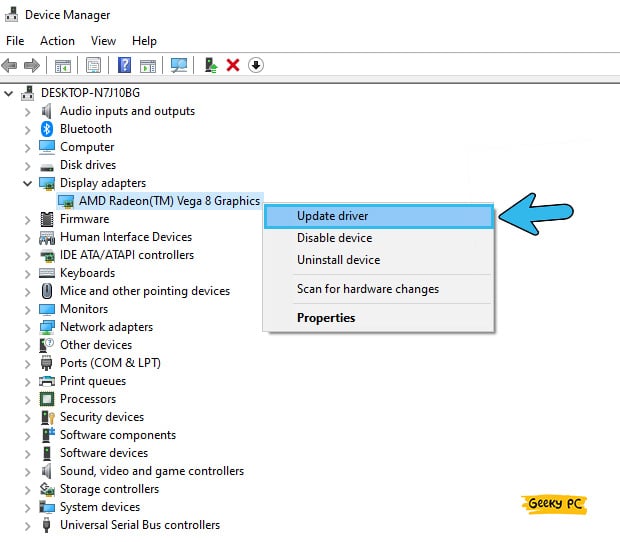
- Step 5: Select the “Update Driver” option from the list.
- Step 6: Once the new popup message appears, select the “Search automatically for drivers” option.
- Step 7: Follow the on-screen instructions and let windows find the right GPU driver.
- Step 8: Once the new driver is installed, reboot your system, and check whether the issue is still present.
11. Update Your Operating System
Not just graphics-related glitches, updating your windows OS in a timely interval can solve various security loopholes and bugs on your system.
So, if you are frequently getting monitor or other graphics issues, you should update your Windows OS to rectify those bugs.
- Step 1: Click on the “Magnifying Glass” icon located at the bottom-left corner of your Windows screen.

- Step 2: Once the search field appears, type “Windows Update” and click on the first result on that page.
- Step 3: Once the “Update” window launches, click on the “Windows Update” option located on the left panel.
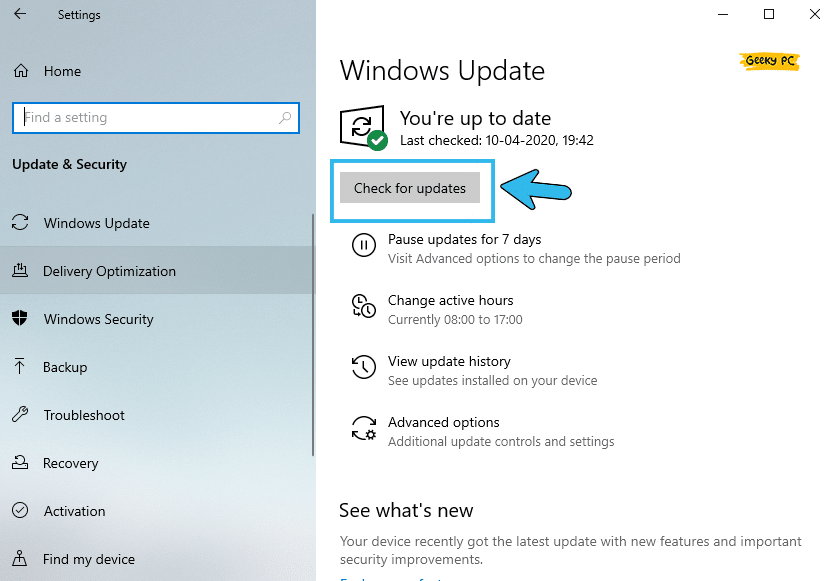
- Step 4: Now, click on the “Check for updates” option on the right panel.
- Step 5: Let windows automatically find the latest update and install it.
- Step 6: Once your OS is completely updated, reboot your system.
Many Windows users have reported getting an unresponsive taskbar once they have rolled out the newest update on their devices.
12. Run SFC Command
SFC or “System File Checker” is a troubleshooting mechanism that comes pre-installed with the latest Windows these days.
This tool mainly cross-checks and verifies the system files in your device’s root directory to search for and fix bugs and errors. And you can initiate this tool from the command prompt.
- Step 1: To launch the “Run” command, press the “Windows Key + R” buttons together.
- Step 2: Type “CMD” in the command field.
- Step 3: Press the “Ctrl + Shift + Enter” buttons together to launch the command prompt window with administrative privilege.
- Step 4: Press the “Yes” option when you get the new “Do you want to make changes on your device” popup message.
- Step 5: Once the black CMD window finally launches, type “sfc /scannow,” and hit the enter button.

- Step 6: Let SFC search and fix the corrupted files on your root directory and reboot when the operation is done.
It is better to disable your antivirus before running the SFC command on windows devices. A strong defender can restrict SFC from digging into the system files in the root directory. So, you need to manually disable the antivirus till the SFC finishes its operation.
Conclusion
It is perfectly safe if you get a generic PnP monitor error on your system, but your GPU can rightly detect it and display the correct resolution and refresh rate.
However, you can also try the generic fixes without any supervision, as those are safe to try. But yes, you should create a restore point before trying any pro methods.
So, that’s all the solutions we have for the monitor issue. If you think we have missed any effective methods or if you have any other alternative solution, feel free to let us know in the comment box below!
FAQs
Q. Are generic PnP monitors any good?
There is no issue if Windows shows a generic PnP monitor, but your GPU can detect it. As far as the graphics issues are concerned, if the monitor is showing proper display with the right resolution and optimum refresh rate, the generic monitor is not an issue, and you can certainly proceed with it.
Q. Does my monitor need a separate driver?
If you are using a plug-and-play monitor on your system, you don’t need a separate driver for that. However, if you are using a high-end monitor that comes with a driver from the manufacturer’s end, you must install it to get the correct refresh rate, color vibrancy, contrast, and optimum resolution.
Q. How to update the generic non-PnP monitor?
You first need to go to the “Device Manager” app and then navigate to the “Monitor” option to expand it. Once you locate your generic non-PnP monitor, just right-click on it to fetch the additional menu. Now, click on the “Update Driver” option and then proceed with the “Search automatically for drivers” option to update it.
Q. How to get rid of ghost displays?
Right-click on the empty space on your desktop to fetch the menu. Select the “Display Settings” option from the menu to launch the settings app. Now, navigate to the right panel and select the third monitor from the “Multiple Display” header. Navigate and click the “Remove this display” option and click “OK” to remove it altogether.

Leave a Reply
View Comments