The keyboard is an input device that is an absolute necessity for any Windows system. But we had to bang our heads when the backspace was not working on that keyboard, isn’t it? Although this issue can arise frequently, some generic and advanced fixes can quickly resolve this error.
Updating the keyboard driver and the Windows OS itself is likely to solve the backspace error. Besides, you may also need to disable the Windows defender. It is better to disable the sticky and the filter keys as well. You can also disable the fast startup option to fix this bug!
However, these are not the only solutions, as serious errors need profound tweaks as well. But before we reveal those, let’s understand the root causes behind the keyboard errors in Windows systems.
Why Does The “Backspace Not Working” Error Occurs In Windows 10?
An unresponsive keyboard is one of the most common issues that any user faces. However, this keyboard issue can occur from either the software or the hardware bugs on your system.
But considering a broad spectrum, this issue can typically arise for six main reasons.
- The USB or PS2 jack of your keyboard or the keyboard itself is faulty and has hardware issues.
- You are using an obsolete version of your keyboard driver, or the driver itself has errors in it.
- The Windows OS you are using is outdated and needs a fresh update to run the latest drivers.
- Windows Defender or any other third-party antivirus is conflicting with the keyboard driver.
- You have enabled Sticky Keys and Filter Keys in the Windows settings.
- The background application in the “Fast Startup” mode conflicts with the keyboard driver.
Besides Windows, you can also get the backspace error even on Chromebook. Moreover, many people have also reported getting this issue on their browsers, such as Google Chrome and Mozilla Firefox!
2+ Easy Troubleshoots If The Backspace Is Not Working
Before you do some modifications to your system configuration or before you try any pro methods, you need to apply two general troubleshooting methods first to identify the root cause of this situation.
1. Clean Your Keyboard Manually
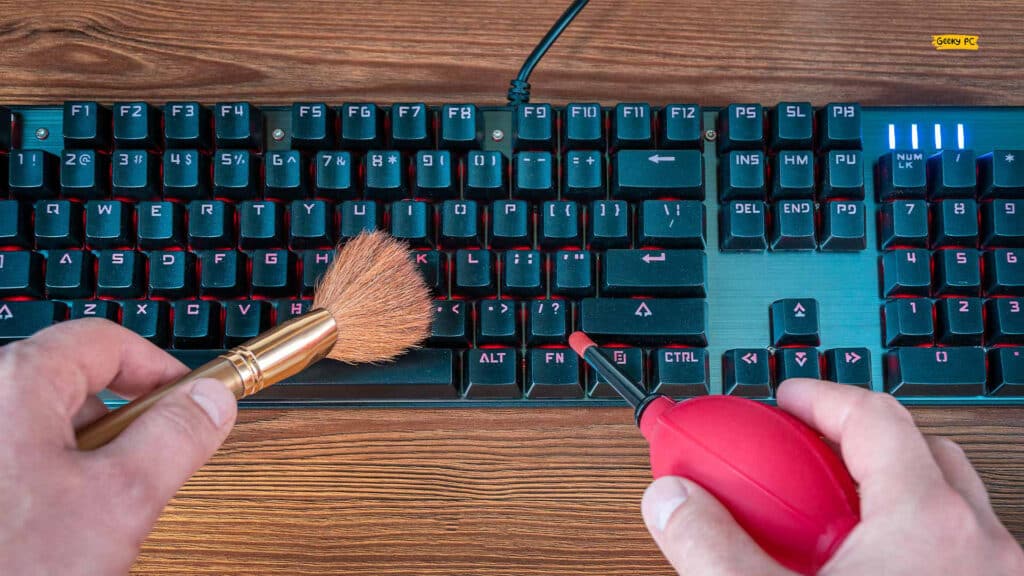
It may happen that the keyboard you are using is not getting the right amount of power due to dust accumulation. In such cases, you should clean your keyboard first with a dry blower. But beware, don’t use any liquid substance as your keyboard may get water-damaged by that.
If you are using any advanced keyboards like a mechanical one or a backlit one, you can also remove all the individual keys and then clean the keyboard with a blower. You should also check the jack to check if there is any wear and tear on it!
2. Attach A Different Keyboard
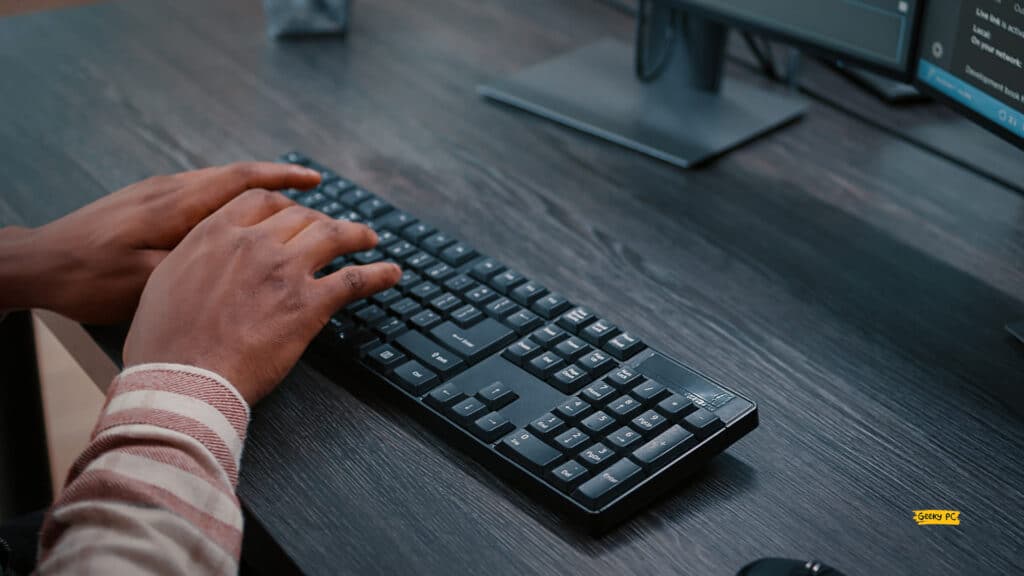
It is also possible that there is no error on the driver or the software part, as you have main issues with the keyboard hardware or the USB port itself. It is better to try your system with a different keyboard in such cases. Just remove your existing one and plug in the new one.
It is also better to use a USB-type keyboard if you are using old-school PS2 keyboards. And even if you are using the latest USB one, you need to plug it into the back panel of your CPU rather than using the USB ports located at the top or front panel.
5+ Easy Fixes If Your Backspace Is Not Working
If the backspace is not working on your system after trying another keyboard or trying a different port altogether, you can fix this error with some easy tweaks.
So, before you try anything advanced, you need to apply these generic methods first. And in almost 90% of cases, these generic fixes alone can solve this issue!
3. Crosscheck Using On-Screen Keyboard
If the backspace is not working in word on your system, you may have an interference issue with the hardware and its software counterpart.
So, it is better to crosscheck the software first with the on-screen keyboard to know if the system is recognizing the inputs or not!
- Step 1: Click on the “Windows” button located at the bottom-left corner of your taskbar and select “Settings” (gear icon) from the core menu.
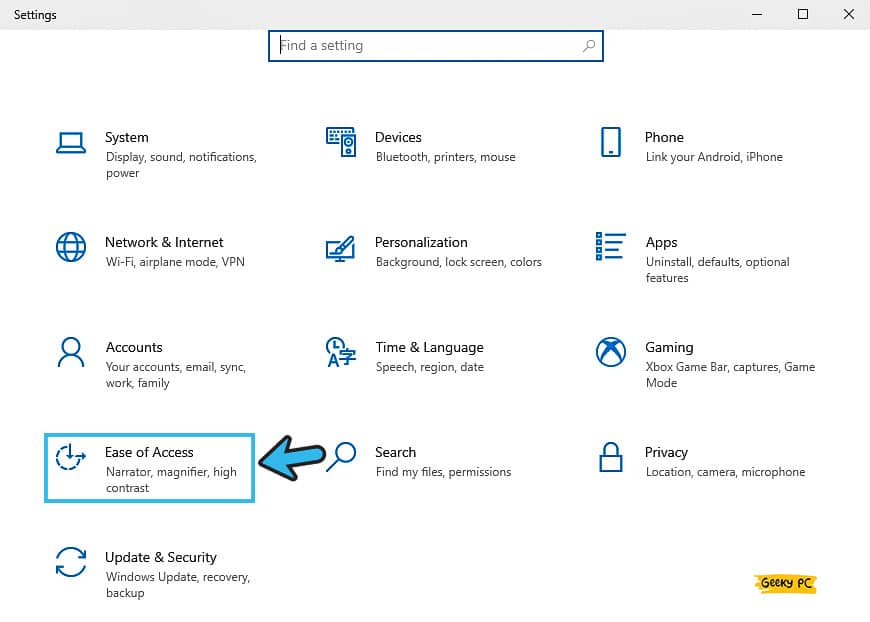
- Step 2: Once the “Windows Settings” menu launches, scroll down and click on the “Ease of Access” option.
- Step 3: After the new settings app opens, navigate to the “Keyboard” option from the left panel.
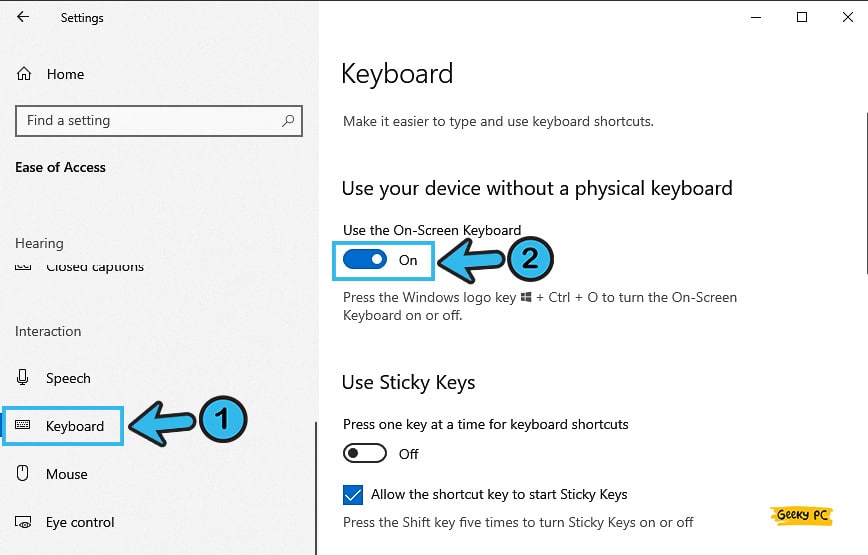
- Step 4: Locate the toggle switch adjacent to the “Use the on-screen keyboard” header on the right panel and switch it on.
- Step 5: Exit from the settings app and start typing with the on-screen keyboard to check the software issues.
Once the virtual keyboard opens up, you need to press the backspace key a couple of times to know if the soft keys are working or not. If they are working, you have hardware issues with your keyboard. And you need to either repair or replace the keyboard.
4. Troubleshoot Keyboard
If you make any serious changes to your system if the backspace is not working on the keyboard, you need to troubleshoot it first to identify the root cause of this issue. And if you have the latest Windows 10 version, you can use the pre-installed troubleshooter to do this!
- Step 1: Click on the Windows button at the bottom-left corner of your taskbar and then click on the “Gear” icon to launch the “Settings” app.
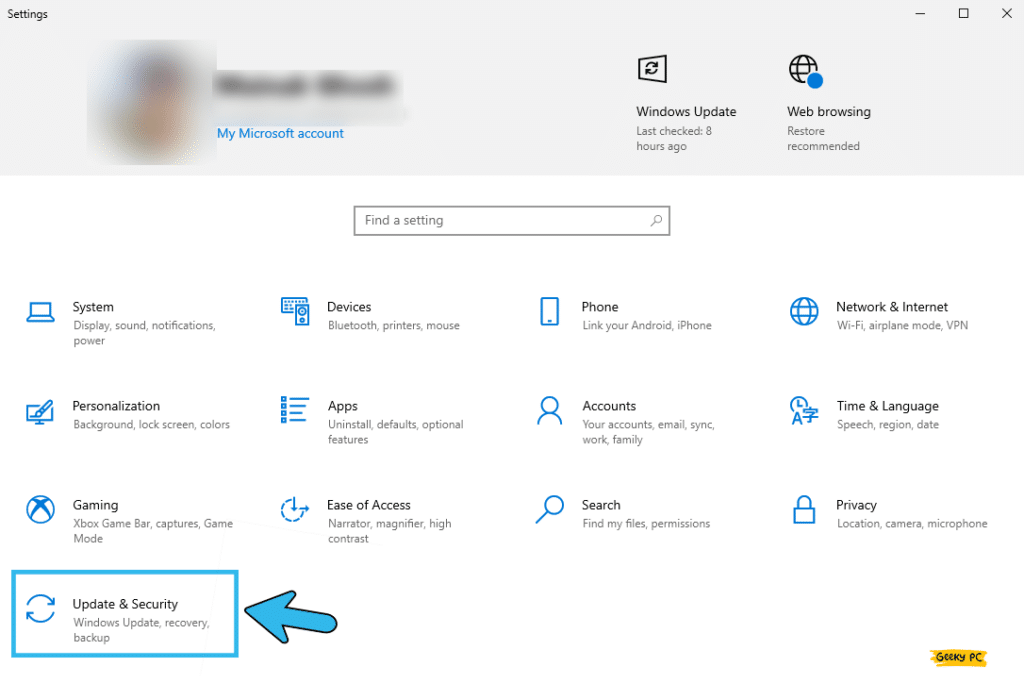
- Step 2: Once it opens up, scroll down and click on the “Update & Security” option.
- Step 3: From the left panel of the newly launched window, click on the “Troubleshoot” button.
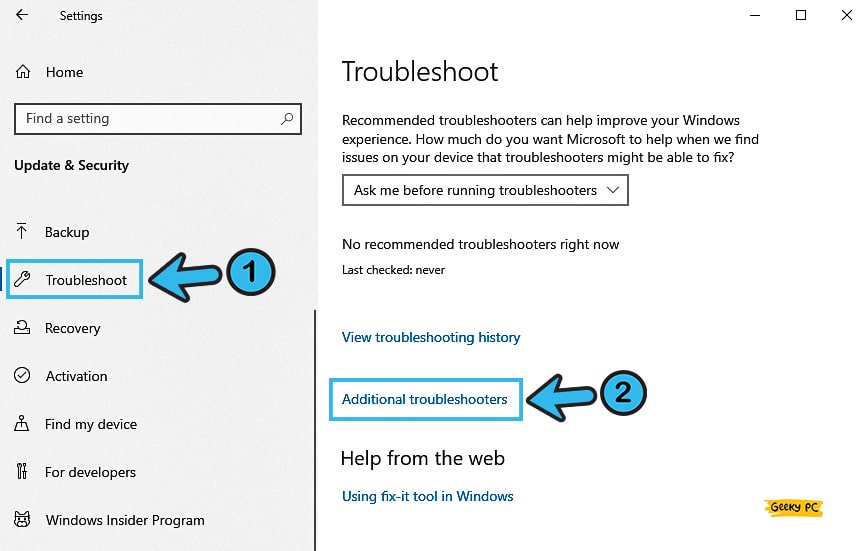
- Step 4: Click on the “Additional Troubleshooters” option located on the right panel.
- Step 5: After the new troubleshooting menu launches, scroll down and click on the “Keyboard” option.
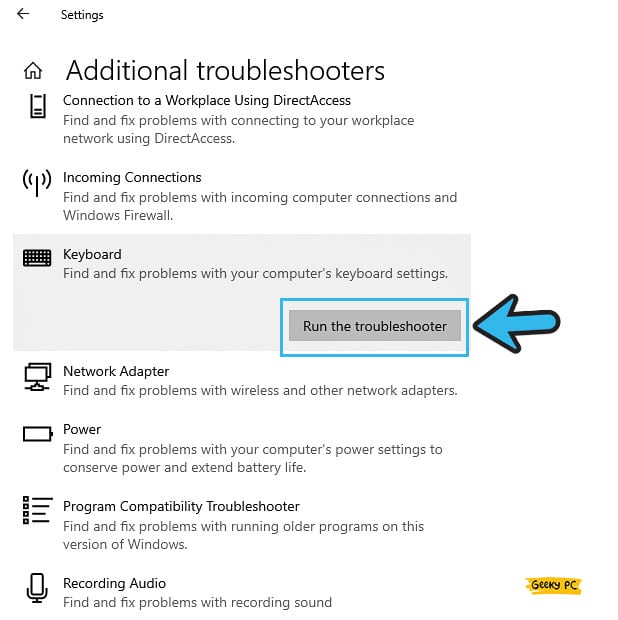
- Step 6: Follow the on-screen instruction and let Windows find the anomaly!
Besides software troubleshooting, hardware troubleshooting is also necessary. And you can also change the CPU port to insert the keyboard jack if possible. It is also better to switch to the USB-type keyboard if you are still using the old PS2 variants.
5. Uninstall Keyword Device
If you are not getting this error constantly, but the backspace is not working sometimes, you may have wrongly installed a mismatched driver or currently using an obsolete one. So, you better uninstall the entire keyboard driver from your system and give it a fresh start.
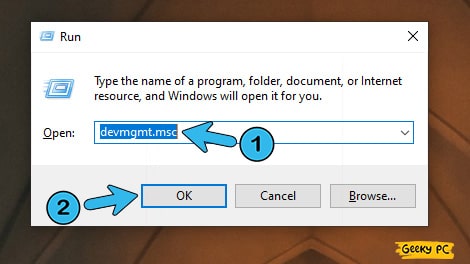
- Step 1: Press the “Windows Key + R” buttons together to launch the “Run” command.
- Step 2: Type “devmgmt.msc” in the command box and hit enter to launch the “Device Manager” app.
- Step 3: Once the new window appears, click on the “Keyboards” option to expand it.
- Step 4: Select your keyboard from the list (HID Keyboard Device is the default), right-click to open the menu, and select the “Uninstall device” option.
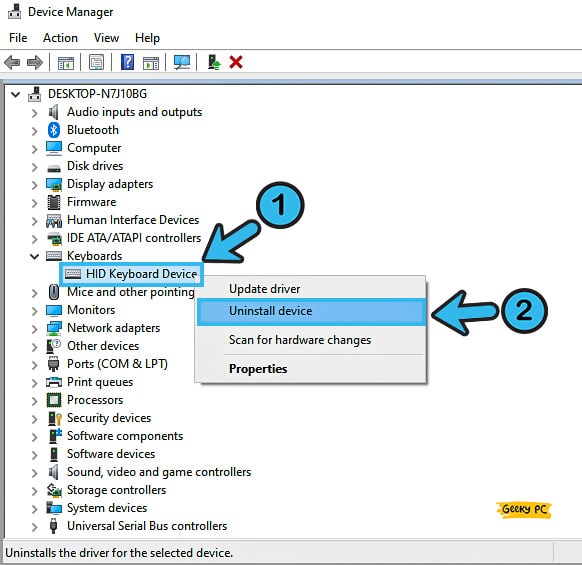
- Step 5: Once the popup message appears, click on “Uninstall” to initiate the process.
- Step 6: Restart your device once the driver is completely uninstalled.
Don’t worry; your keyboard will run smoothly, even if you uninstall its driver. Microsoft will find the best available driver for you during the next startup and will automatically install it to give you the same keyboarding experience.
6. Update The Keyboard Driver
If you haven’t already downloaded the latest driver for your keyboard or using an obsolete version of Windows where the driver packs are also outdated, you need to manually install the newest driver pack for your keyboard.
It is even more essential if you are using a mechanical one.
- Step 1: Press the “Windows Key + R” buttons together to launch the Run command.
- Step 2: Type “devmgmt.msc” in the blank field and hit enter to open the “Device Manager” app.
- Step 3: After the window launches, click on the “Keyboards” to expand it.
- Step 4: Right-click on your keyboard (the default is HID Keyboard Device) and click on the “Update driver” option.
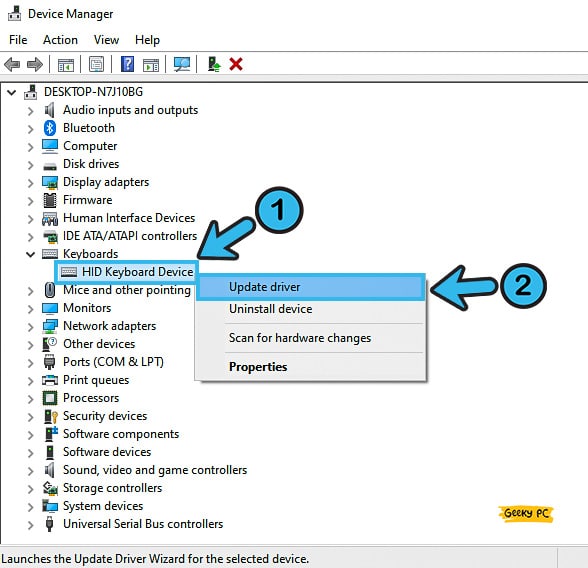
- Step 5: Select the “Search automatically for updated driver software” option once the new popup message appears.
- Step 6: Let Windows find the best-suited driver for you and follow the on-screen instructions to install the latest update.
- Step 7: Restart your device once the updating process is completed.
If you are using any high-end mechanical or gaming, or backlit keyboard that comes with its own driver from the manufacturer itself, you need to install that particular one to have a smooth typing experience.
It is also better to check the manufacturer’s site to know if they have released any latest driver updates or not!
7. Update Windows 10
Windows 10 is a brilliant OS, no doubt about that! But it still has some minor flaws and errors that can attract further issues if not solved at the right time.
So, Windows frequently releases updates to deal with those errors. Whenever it is available, you should update your OS.
- Step 1: Click on the “Magnifying Glass” icon located at the bottom-left corner of your taskbar to launch the search menu.
- Step 2: Type “Windows update” in the search field and click on the first option from the result page.

- Step 3: After the Windows update settings menu launches, click on “Windows Update” from the left panel.
- Step 4: Click on the “Check for updates” button in the right panel and let Windows search for the latest updates.
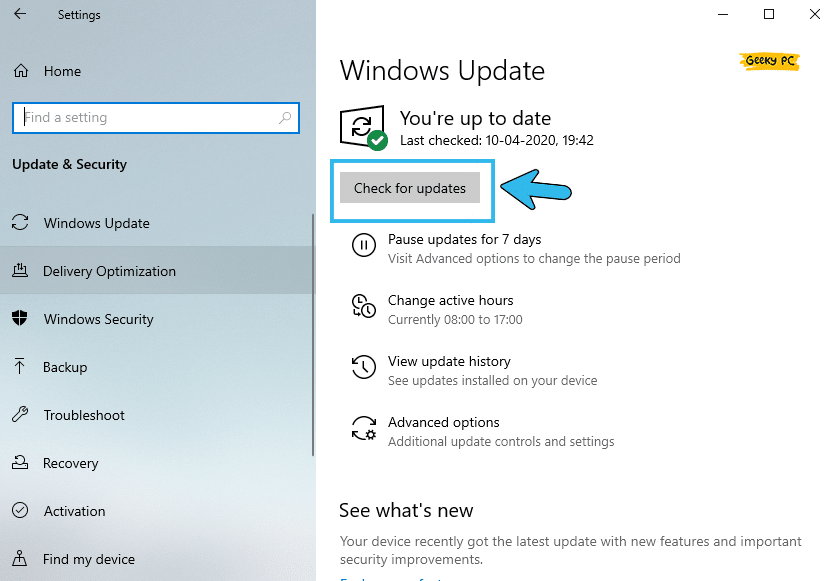
- Step 5: Once the updating process is done, restart your system and plug in your keyboard.
After rolling out the newest Windows 10 updates, several users have already reported getting an unresponsive taskbar, especially if they are using any touch device.
7+ Pro Methods To Resolve The Backspace Error
Even after trying all the generic methods we have listed above, if the backspace is still not working, your problem may be more deep-rooted than the general errors. In such cases, trying the following seven methods is the only solution that remains!
8. Disable Windows Defender
There is no doubt that the latest Windows Defender antivirus is robust security software. But it is very much possible that the antivirus program can block the keyboard driver in the background, especially if it is infected or have any security loops.
In that case, you need to disable the antivirus temporarily to identify the root cause of this error.
- Step 1: Launch the “Settings” app by pressing the “Windows Key + I” buttons together.
- Step 2: Once the new settings menu appears, click on the “Update & Security” options.

- Step 3: Navigate to the left column and click on the “Windows Security” option.
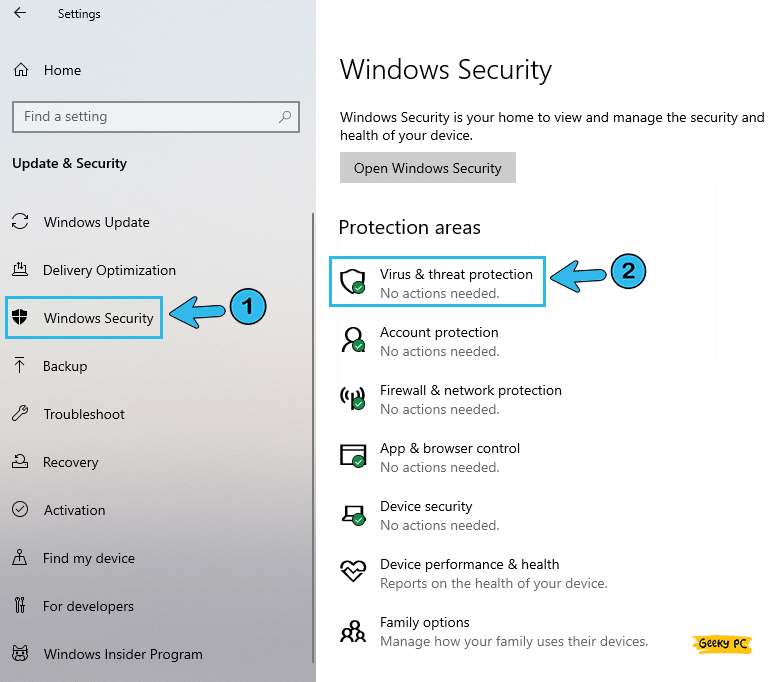
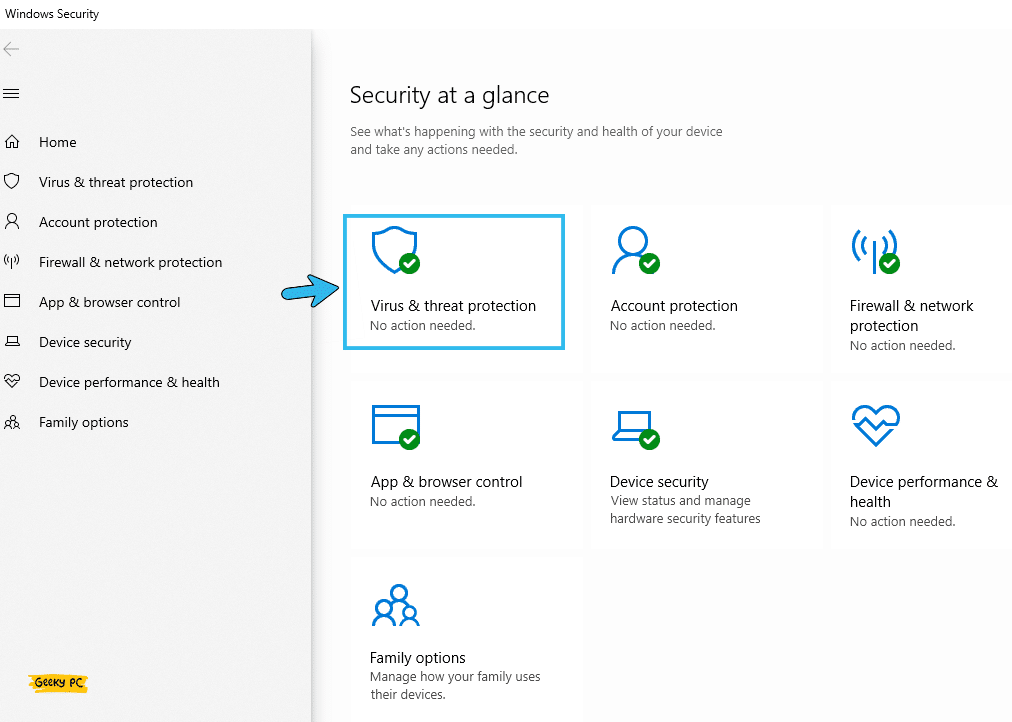
- Step 4: Navigate to the main panel and click on the “Virus & threat protection” option.
- Step 5: Once the new window appears, click on the “Virus & threat protection settings” option.
- Step 6: Navigate and find the toggle switch beside the “Real-time protection” option and switch it off.
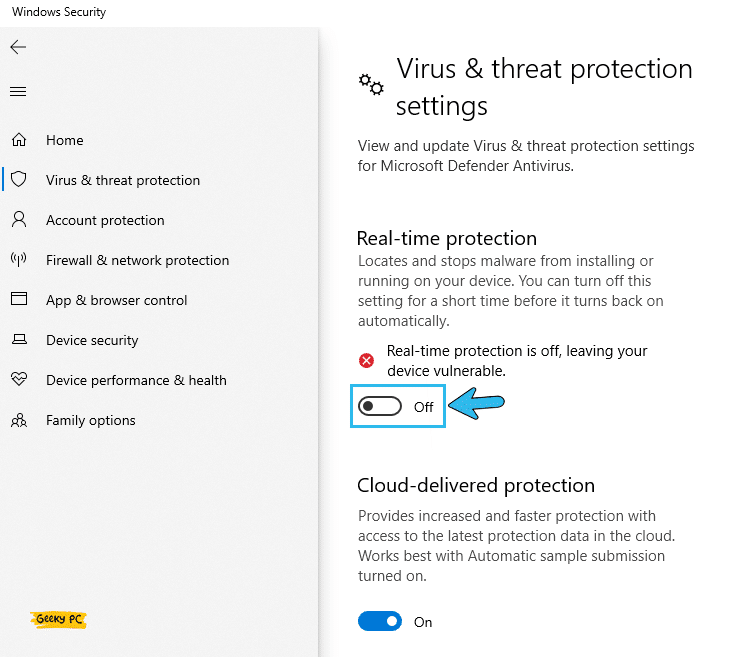
- Step 7: Click “OK” to save the settings and exit from the settings app.
If your system is running under a network administrator, you may get a group policy error after disabling Windows Defender. In that case, you can follow our detailed guide to solve the “This program is blocked by group policy” error in Windows 10 systems.
9. Disable Sticky Keys And Filter Keys
There is an in-built tool called “Ease Of Access” already present in Windows 10 that is designed to tackle accessibility issues.
And there are two main parameters called the “Sticky Keys” and “Filter Keys” that can conflict with the current keyboard settings. So, you need to check your keyboard once again after disabling these two options.
- Step 1: Press the “Windows Key + R” buttons together to initiate the “Run” command.
- Step 2: Type “Control” in the command field and hit enter.
- Step 3: Once the “Control Panel” app launches, navigate to the “View by” option located at the top-right corner and set that to “Category” mode.
- Step 4: Now, click on the “Ease Of Access” option to initiate the accessibility menu.
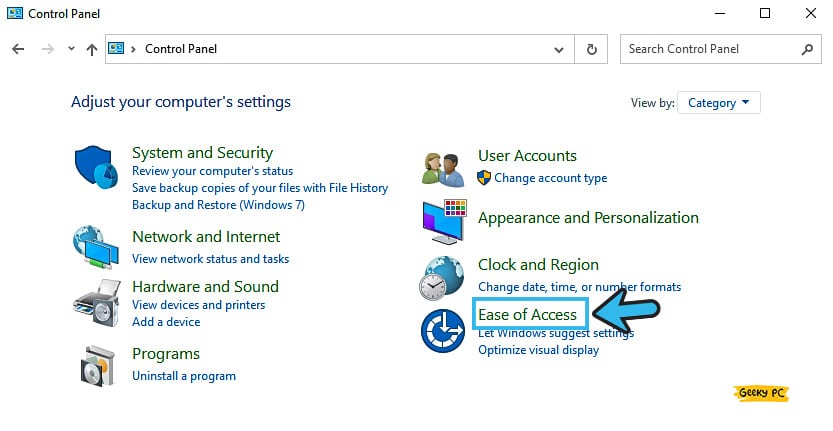
- Step 5: After the new window appears, click on the “Change how your keyboard works” option from the right panel.
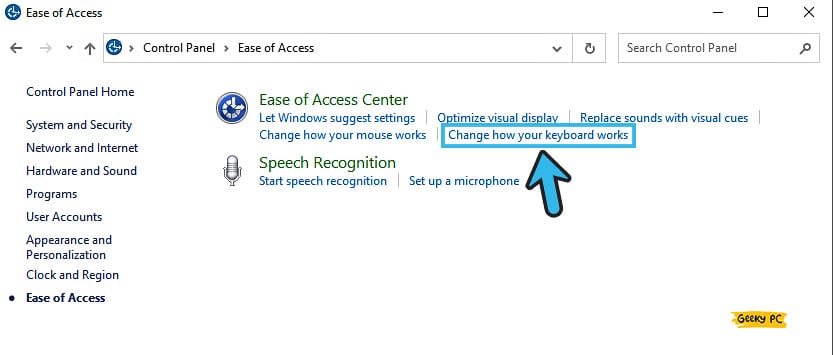
- Step 6: Once the new menu launches, uncheck the adjacent boxes to both the “Sticky Keys” and “Filter Keys” options located under the “Make it easier to type” header.
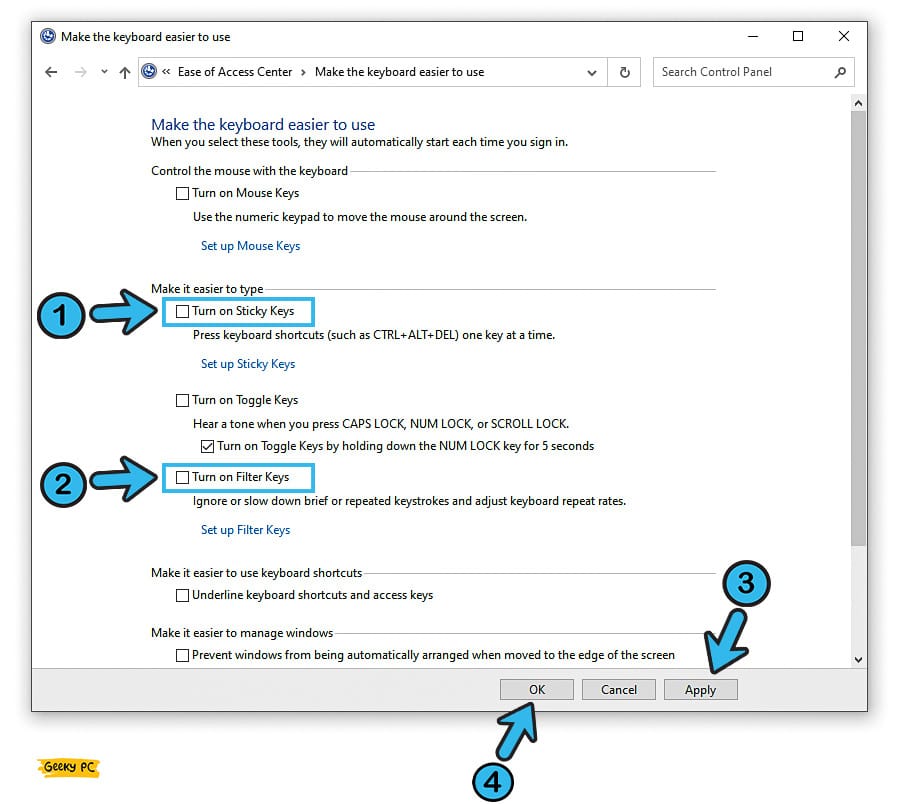
- Step 7: Click “Apply” and then “OK” to save the settings.
- Step 8: Restart your device and check if the keyboard is now working correctly.
If you disable both these options, some keyboards may not be as responsive as they used to be before, especially if you are using a high-end mechanical or gaming keyboard. So, it is better to turn these on after pinpointing the root causes of this unresponsive keyboard issue.
10. Disable Fast Startup
If the backspace key is not working in Windows 10, even after disabling all the accessibility options, any of your startup applications may be interfering in the background.
So, it is better to disable the fast startup option to check whether the background startup apps are creating any issues or not!
- Step 1: Click the “Magnifying Glass” icon on your taskbar and type “Control Panel” on the search field.
- Step 2: Click on the very first option on the result page to launch the “Control Panel” app.
- Step 3: Once the new Window launches, navigate to the “View by” option at the top-right corner and set it to “Category” mode.
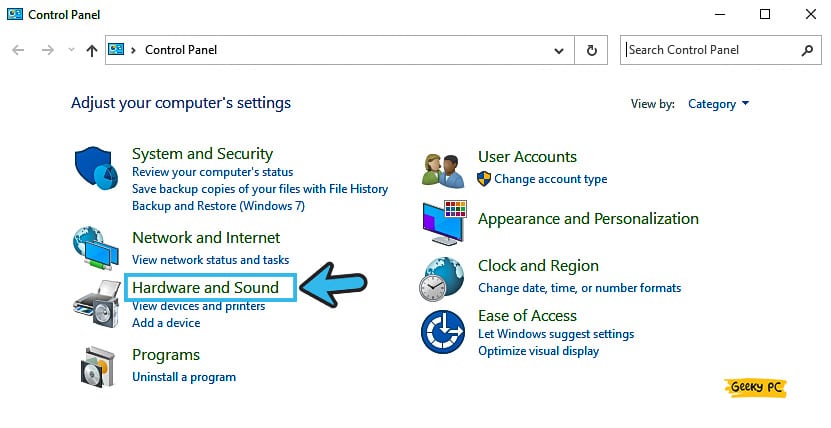
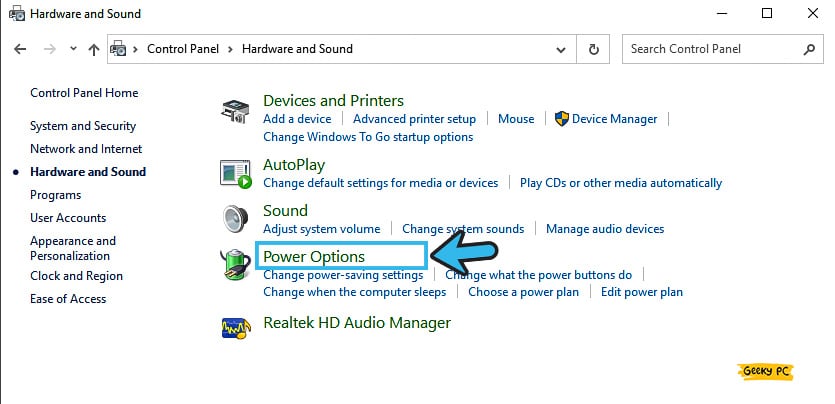
- Step 4: Click on the “Hardware and Sound” option and further click on the “Power Options” icon on the right panel.
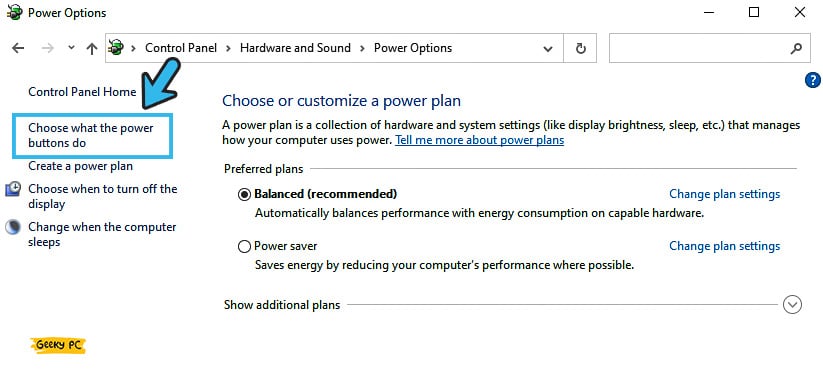
- Step 5: Navigate to the left panel and click on the “Choose what the power buttons do” option.
- Step 6: Once the new window appears, click on the “Change settings that are currently unavailable” option.
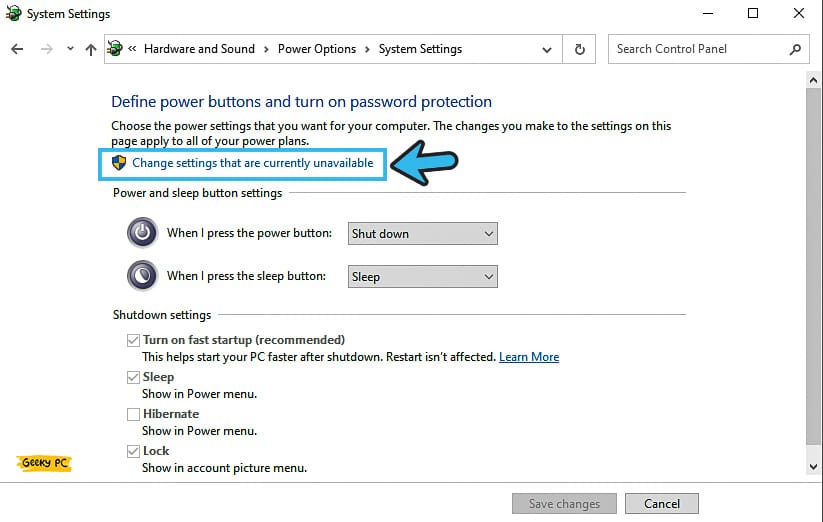
- Step 7: After the new menu appears, uncheck the “Turn On fast startup (Recommended)” option.
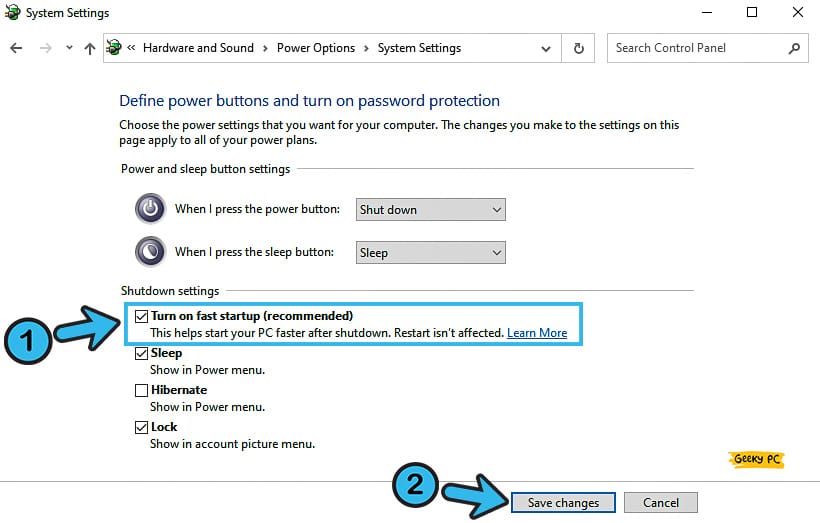
- Step 8: Click “Save” to apply the settings and restart your device without the fast startup.
After disabling the fast startup option, many people have reported getting various errors, especially the undefined network parameter.
11. Disable Startup Applications
Several startup tasks can conflict with hardware drivers, especially if you have app-heavy booting on your system. So, it is better to disable all the startup applications and then check your keyboard to know if any background application is conflicting with the driver or not.
- Step 1: Press the “Windows Key + R” buttons together to launch the “Run” command.
- Step 2: Type “msconfig” in the command field and hit enter to open the “System Configuration” menu.

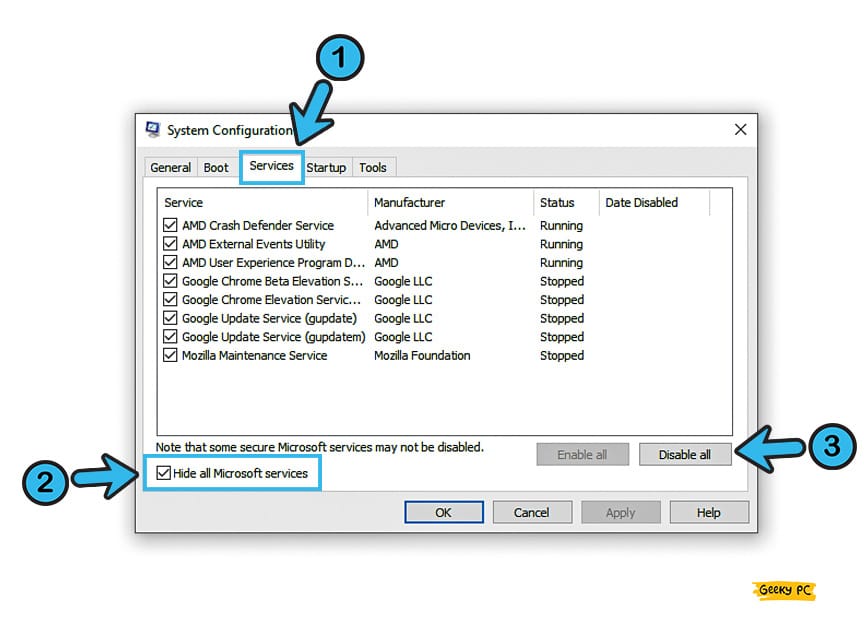
- Step 3: Once the new window appears, navigate to the “Services” tab from the header menu.
- Step 4: Tick the box before the “Hide all Microsoft services” option and further click on the “Disable All” button.
- Step 5: Now navigate to the “Startup” tab from the header menu and click on the “Open Task Manager” option.
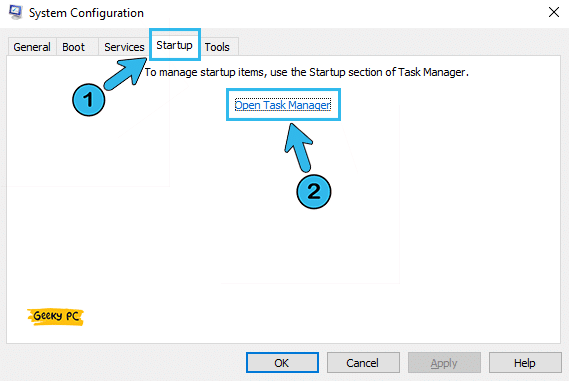
- Step 6: Once the task manager app opens up, select every option one after another and click the “Disable” button.
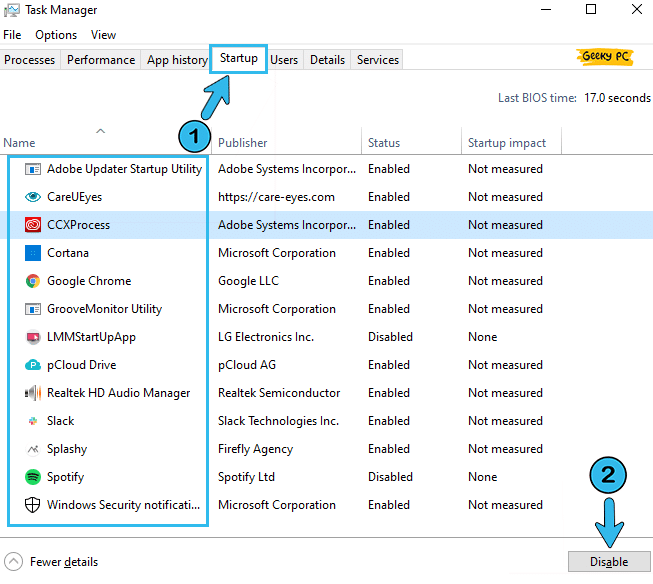
- Step 7: After disabling all the startup applications, restart your system.
Alternatively, you can just start your Windows in “Safe Mode” without any startup application to check whether any application is interfering with your keyboard driver in the background. If you find any, just disable that particular application and give your system a fresh restart.
12. Disable Hardware Acceleration (For Google Chrome)
Many users have reported that their backspace is not working in Chrome, even while it is working perfectly on other applications. If you are facing similar situations, you can either tweak the Google Chrome settings or can completely disable the hardware acceleration to resolve the issue.
- Step 1: Launch the “Google Chrome” browser, type “chrome://settings/system” on the address bar, and hit enter.
- Step 2: Locate the toggle switch beside the “Use hardware acceleration when available” option.
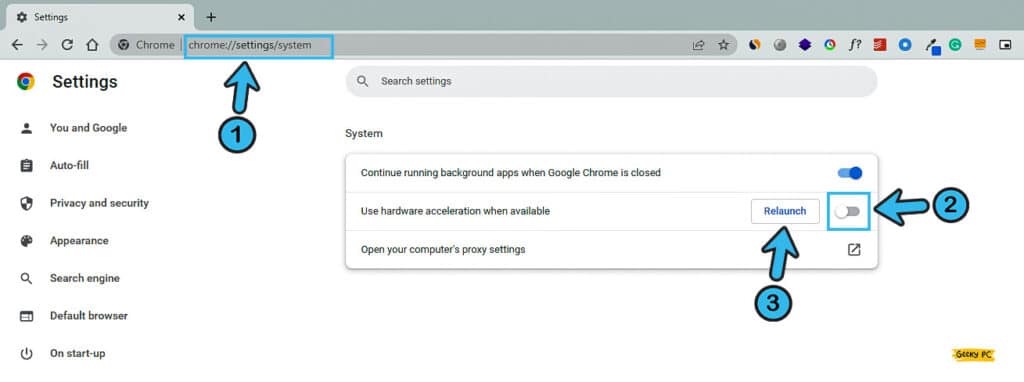
- Step 3: Click the button to disable it and exit from the browser.
- Step 4: Relaunch Google Chrome again to check whether the keyboard is now working or not!
After disabling the hardware override on Chrome, many users have faced gateway issues on their system, especially if they are using the latest Windows 10. In such cases, follow our step-by-step guide to fix the “ERR_NETWORK_CHANGED” error in Windows systems.
13. Restore Backspace Shortcut Key (For Mozilla Firefox)
Like Google Chrome, many users have also reported that the backspace is not working whenever they are using the Firefox browser from Mozilla. In such cases, you can restore the backspace shortcut key from the browser settings itself to rectify this error.
- Step 1: Launch the “Mozilla Firefox” browser and let the homepage load properly.
- Step 2: Type “about:config” in the address bar and hit enter to launch the configuration menu.
- Step 3: Once the new settings menu launches, click on the “Accept the Risk and Continue” option.
- Step 4: Search for “Backspace” and double-click on the “backspace_action” parameter to edit it.
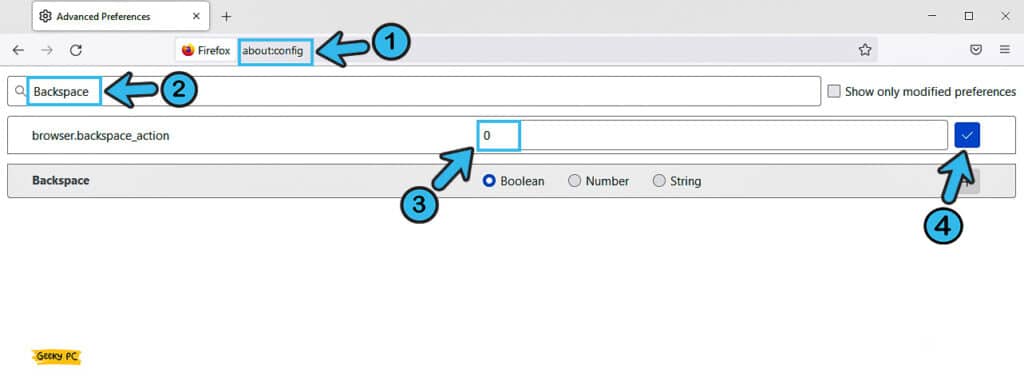
- Step 5: Type “0” in the value field and hit enter to save the settings.
- Step 6: Restart your browser and check if the keyboard is still not working.
Alternatively, you can even open a page in incognito mode in both Google Chrome and Mozilla Firefox to override any existing settings that may conflict with the keyboard driver. Besides, you should also disable all the plugins from these two browsers and check again!
14. Enable Auto-repeat Key (For Chromebook)
If you are not using any Windows-based system but a Chromebook instead, you may still face these keyboard issues, as many users have already reported getting the same error.
But you can simply rectify this error just by enabling the auto-repeat key from the system settings.
- Step 1:Launch the “Settings” app on your Chromebook and navigate to the “Device” menu.
- Step 2: Once the menu launches, click on the “Keyboard” option.
- Step 3: Locate the toggle key adjacent to the “Enable auto-repeat” option and turn it on.
- Step 4: You should also check if the backspace is “Remapped” inside your settings or not.
- Step 5: Restart your Chromebook and check if the issue still persists.
You may also get this unresponsive backspace issue if you are using an obsolete version of Chromebook OS. In such cases, you need to install the latest Chromebook OS update first. And then, you can enable the auto-repeat key to rectify this error.
Conclusion
It is absolutely safe to troubleshoot and then apply the generic methods if the backspace is not working on your system. But, if the problem is deep-rooted and you need some serious tweaks that can alter the system settings, it is better to create a system restore point beforehand.
If anything goes wrong and your OS is having additional issues after the tweak, you can restore the entire system by using that system restore point. So, that’s all the solutions we have, folks! But if you think we have missed any, feel free to drop that in the comment box.
FAQs
Q. How do I fix my keyboard backspace?
First, start with cleaning your keyboard and inserting it into a different port on your CPU. Second, you should update the keyboard driver and the operating system you are using. If nothing is working, disable the sticky and the filter keys from the settings to solve this error.
Q. Why are Backspace and Delete not working?
It is very much possible that you are using an obsolete keyboard driver or an outdated version of the OS itself. Besides, it can also happen that the USB port itself is damaged. Many people have reported getting this error after enabling the sticky and filter keys on their system settings.
Q. Why is my backspace not working in Chrome?
The high chances are hardware acceleration in the Chrome browser itself is causing this error. And to do that, you need to manually disable it. Besides, it may also happen that any one of your installed plugins is conflicting with the keyboard driver. So, you need to check again after disabling all the plugins you have already installed.
Q. How do I reset my keyboard settings?
You need to uninstall and then reinstall a fresh driver pack for your keyboard to reset the keyboard settings completely. Besides you can also restore the entire keyboard settings from the preferences menu. And if you are using a high-end mechanical keyboard, you can tweak that from the software that comes with that.



Leave a Reply
View Comments