Windows 10 have made a true buzz amongst the tech heads as it outnumbered Windows 7 and Vista in no time. It has also delivered stern competition to the newly launched Windows 11 as most people are not ready to roll it to the newest OS. However, we have to bang our heads if the ethernet is not working in Windows 10, isn’t it?
Replugging the port and reenabling the connection are likely to solve the issue. Besides, you may also need to disable the firewall and stop using proxy servers to fix this ethernet issue in Windows 10. You have to keep the network driver updated and enable automatic IP assignment!
However, there are some advanced methods to fix this problem if nothing is working. But before we reveal those methods, let’s understand the root causes of this issue in your Windows systems.
What Are The Primary Causes Of Ethernet Not Working In Windows 10/11?
After rolling to the newest update, several people have reported that the ethernet port is not working in Windows 10/11. Although this ethernet issue can arise for several reasons, six primary causes can trigger this issue if you consider a broader spectrum.
- You have accidentally disabled the ethernet port or have faulty network parameters.
- The driver for your network adapter is obsolete and needs a fresh update.
- You are using a dynamic IP connection but haven’t enabled automatic IP assignment.
- The proxy server you are using is causing the interference issue with the ethernet.
- Windows Firewall or any other third-party firewall is blocking the ethernet connection.
- The DNS you are using is unresponsive or taking too much time to respond.
Even if you solve the ethernet issue through tweaks, you may still witness an undefined network error in Windows-based devices.
4+ Quick Fixes For Ethernet Error In Windows 10/11
Before you resort to any pro methods that need some serious tweaks to your system, you need to apply the generic fixes first if the ethernet is not working in Windows 10. And in almost 90% of cases, these generic methods alone can fix the ethernet errors in no time!
1. Enable Ethernet Connection
You will most likely get an ethernet error if your LAN port is not working in windows 10. However, many of us keep on trying to reconnect it without even enabling it in the first place.
So, before you resort to anything, you need to check whether your ethernet connection is enabled or not.
- Step 1: Press the “Windows Key + R” buttons together to launch the “Run” command.
- Step 2: Once the Run command launches, type “ncpa.cpl” in the search field and hit enter.
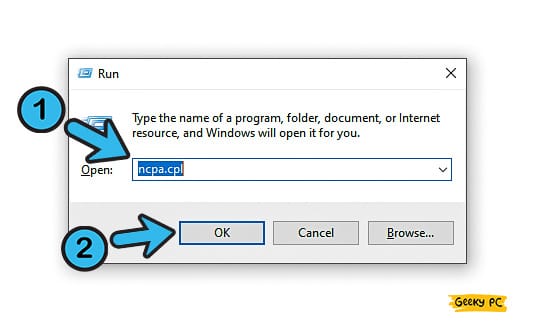
- Step 3: After the new “Network Connections” window opens up, Locate the “Ethernet” icon.
- Step 4: Right-click on the “Ethernet” icon and select “Enable” from the additional menu.
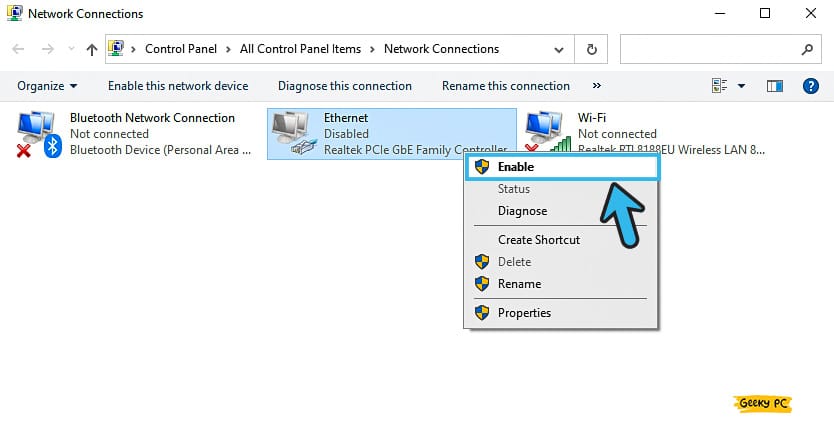
- Step 5: Once it is enabled, right-click on the “Ethernet” icon again and click on the “Status” option to check the live status of your connection.
If you are using an external router or modem, you also need to enable or switch on those before enabling your ethernet connection. You should also check whether the LAN cable is correctly inserted into your CPU or not.
2. Try Resetting The Ethernet Adapter
Many times, enabling the ethernet alone won’t solve the network issue, especially if you have a buggy connection. Besides, you may have a wrongly configured ethernet as well. In such cases, you need to reset your ethernet adapter altogether to fix this bug.
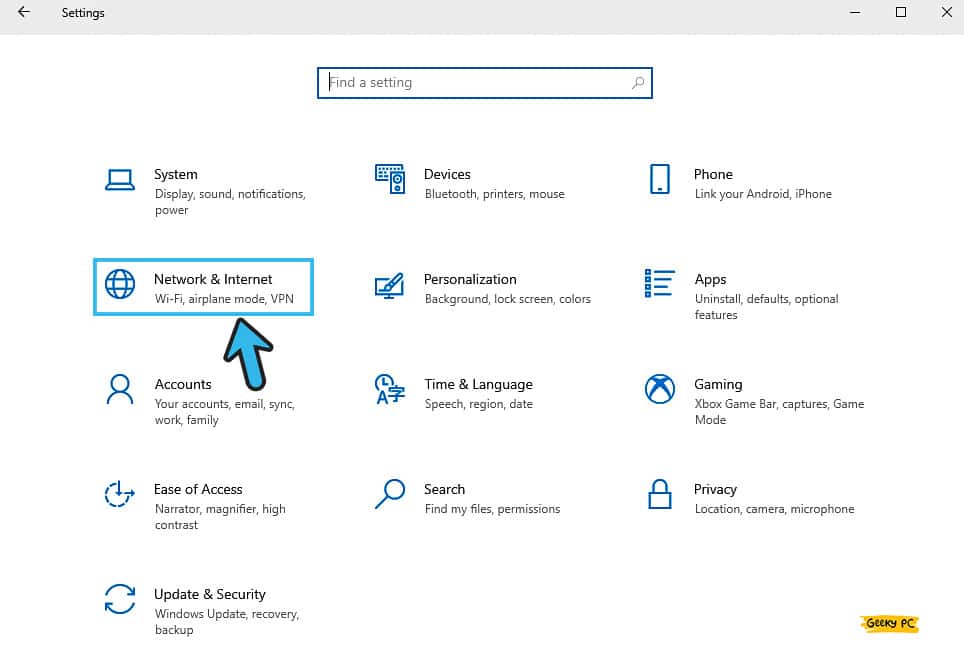
- Step 1: Press the “Windows Key + I” buttons together to open the “Settings” menu.
- Step 2: Once the new window launches, click on the “Network & Internet” option to launch the networking menu.
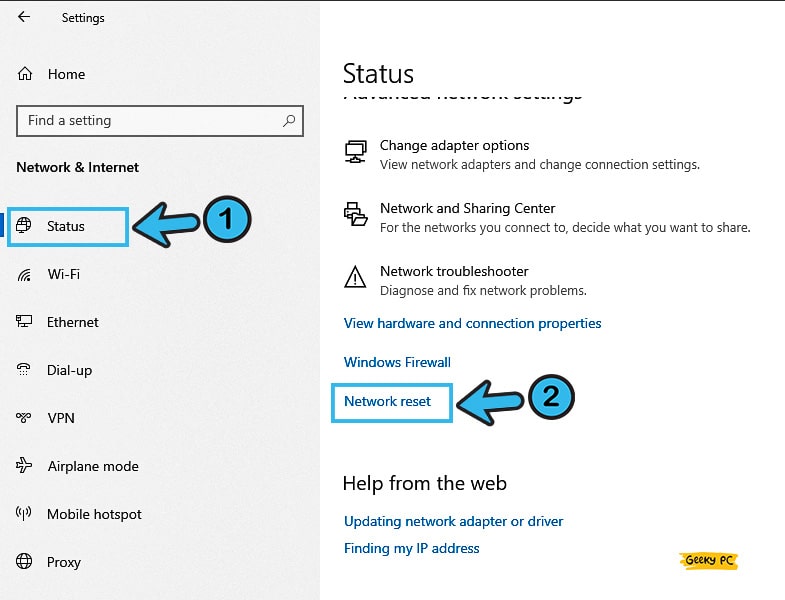
- Step 3: Click the “Status” option located on the left panel to launch the current ethernet status.
- Step 4: Scroll down and click on the “Network reset” option located on the right panel.
- Step 5: Once the new prompt appears, click on the “Reset Now” button and wait until the resetting operation ends.
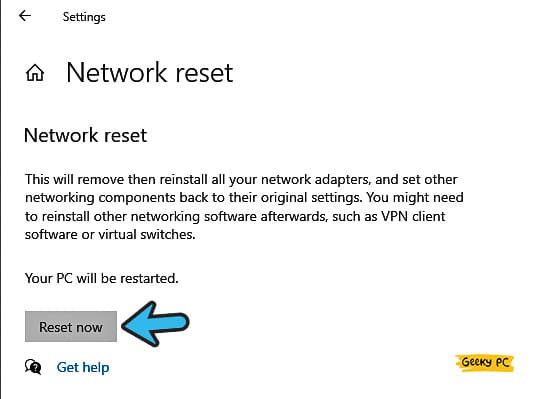
- Step 6: Now, enable the Ethernet connection again to check whether the issue still persists.
If you are using any static IP connection given by your ISP, you need to note down all your parameters, including IPV4 address, subnet mask, default gateway, etc. After resetting the ethernet connection, you may also need to configure it with those static parameters.
3. Reset Network Parameters
If the ethernet issues still persist even after soft resetting it, you may need to hard reset it through the command prompt.
And in that case, you can completely flush the DNS and manually configure the connection to give your network or ethernet connection a fresh start.
- Step 1: Press the “Windows Key + R” buttons together to launch the “Run” command.
- Step 2: Once the new run command window appears, type “CMD” and hit enter to launch the command prompt window.
- Step 3: Type the following commands: “ipconfig /release,” “ipconfig /flushdns,” “ipconfig /renew,” and “ipconfig settings.” Hit enter after each one of them.
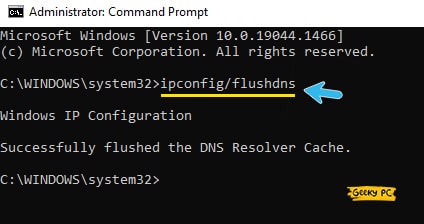
- Step 4: Check whether the network connection is working. If not, launch the “Command Prompt” window again.
- Step 5: Now, type the following commands: “nbtstat –r,” “netsh int ip reset,” “netsh winsock reset,” “netsh winsock reset catalog,” and “netsh int ipv4 reset reset.log”. Hit enter after each of these command lines.
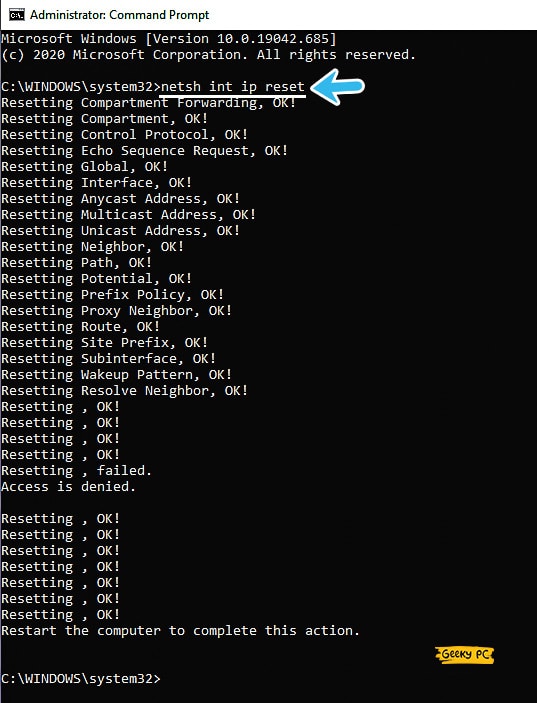
- Step 6: Once you fully reset the connection, type “Exit” to close the command prompt.
If you flush the DNS and the IP, especially while using a static IP connection, you need to manually configure it with the parameters given by your ISP.
Besides, you should also open the command prompt itself with administrative rights to override the parameters.
4. Update Ethernet Drivers
If the network error is still coming back even after resetting the connection and your ethernet cable is not working in Windows 10, you may be using an obsolete version of the network adapter driver itself. In that case, you need to update the network driver to fix this error.
- Step 1: Right-click on the “Windows” button located at the bottom-left corner of your taskbar.
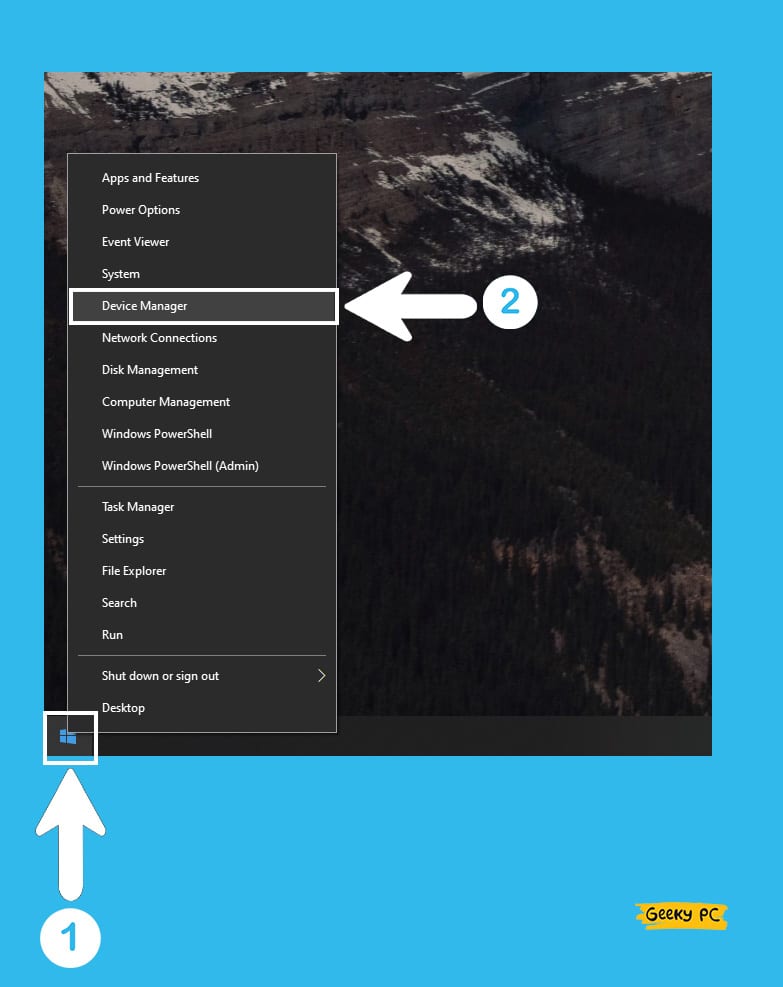
- Step 2: Click on the “Device Manager” option from the additional menu.
- Step 3: Once the new window appears, click the “Network adapters” option to expand it.
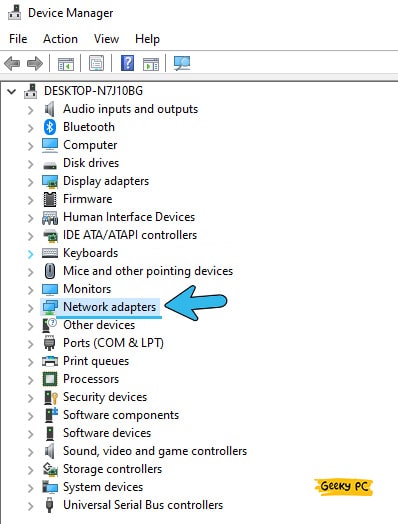
- Step 4: Navigate to your ethernet device, right-click to initiate the additional menu, and click on the “Update Driver” option.
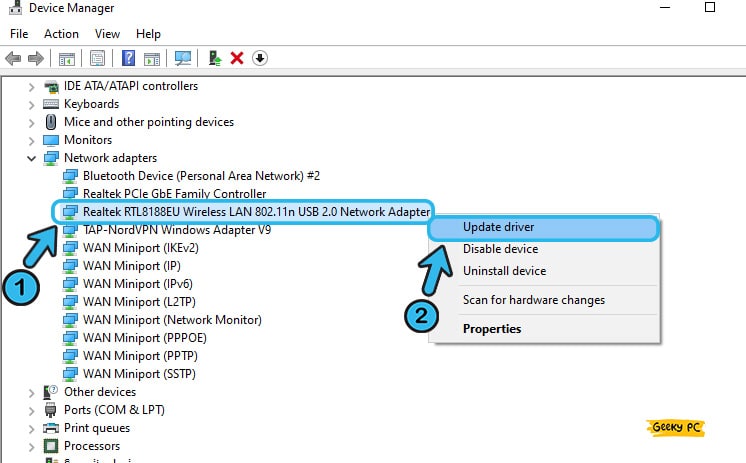
- Step 5: After the new window launches, click on the “Search automatically for updated driver software” option.
- Step 6: Let windows search for the latest available update and follow the on-screen instruction to update it.
- Step 7: Once the updating process is completed, restart your PC and check whether the connection error still persists.
If you want to update it without having an active internet connection, you can simply choose the “Browse my computer for driver software” option in the fifth step.
And then click on “Let me pick from a list of available drivers on my computer” from the prompt menu. You can then select the latest “Realtek PCIe FE Family Controller” driver to update it manually.
7+ Advance Fixes If Ethernet Or LAN Is Not Working In Windows 10
If your ethernet is not working in Windows 10, even after trying all the generic fixes mentioned above, your problem may be way more deep-rooted than you can possibly assume.
In such cases, adopting advanced methods and tweaking the entire settings are the only options remained that can effectively solve this issue.
5. Setup A New Connection
It may sometimes happen that you have wrongly configured the existing network connection with basic parameters. In that case, you can create and set up a new connection altogether and use that instead of your old connection.
- Step 1: Click on the “Magnifying Glass” icon located at the bottom-left corner of your taskbar to launch the search bar.
- Step 2: Type “View network status and tasks” inside the search field and click on the first result.
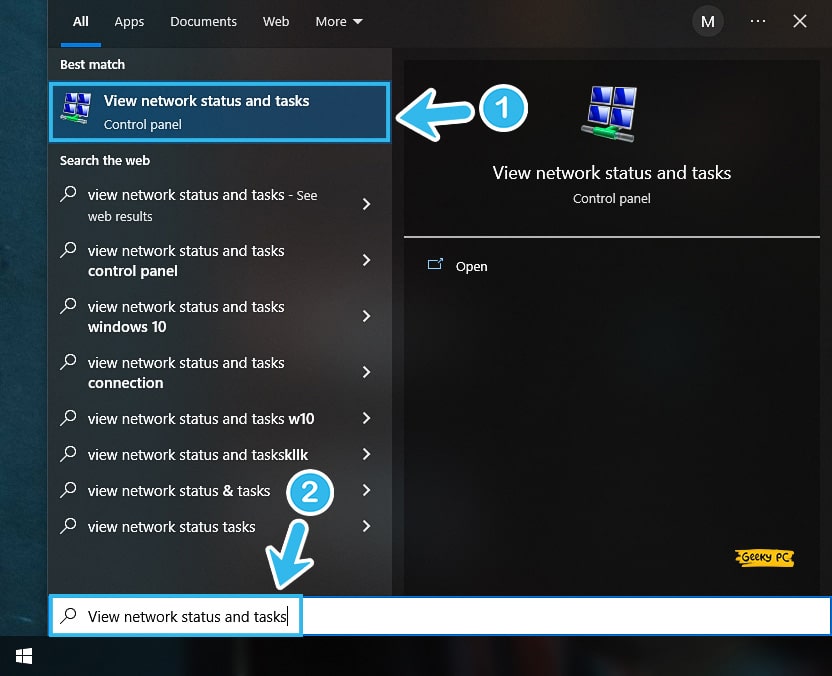
- Step 3: Once the new window appears, click on the “Set up a new connection or network” option to initiate the process.
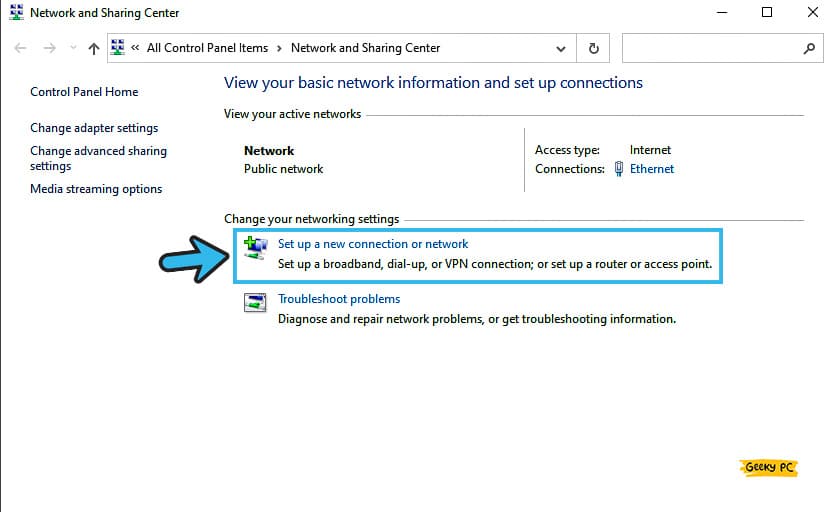
- Step 4: After the new popup box appears, select the “Connect to the Internet” option, and click the “Next” button.
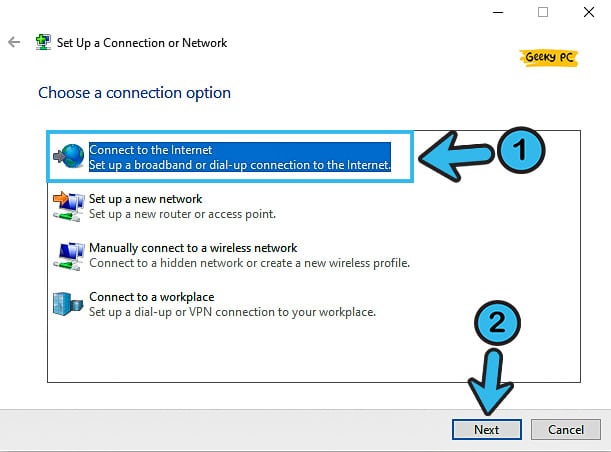
- Step 5: From the new windows, select the “Broadband (PPPoE)” option under the “How do you want to connect?” tab.
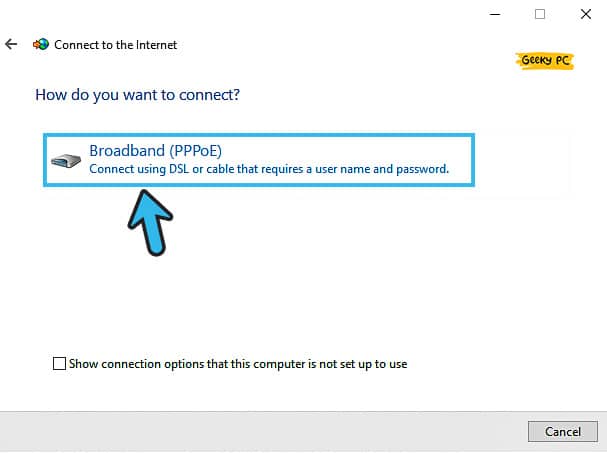
- Step 6: Enter your desired username and password (you can also keep those fields empty for an unrestricted account) and click on the “Connect” button.
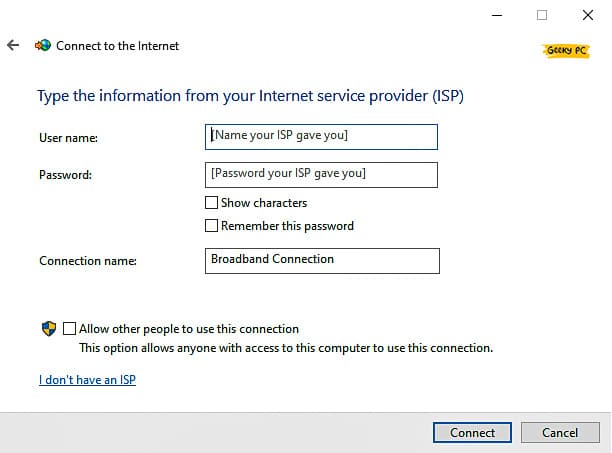
- Step 7: Let Windows finish the setup process and connect directly to the internet.
Many people have reported getting a file privilege error after setting up a new connection altogether, especially if they are using the Steam platform for their gaming. If you face similar issues, you can follow our detailed guide to fix the Steam missing file privileges error in Windows 10.
6. Enable Automatic IP
If you are using an external modem or Wi-Fi router rather than a physical connection, you may encounter connection issues if you just tweak the ethernet. In that case, you need to enable automatic IP assignment if Wi-Fi and ethernet are not working in windows 10.
- Step 1: Click on the “Magnifying Glass” icon to initiate the search field.
- Step 2: Type “View network connections” in the search box and click on the first result to launch the network control panel.

- Step 3: Click on the “Ethernet” option and select “Properties” from the additional menu.
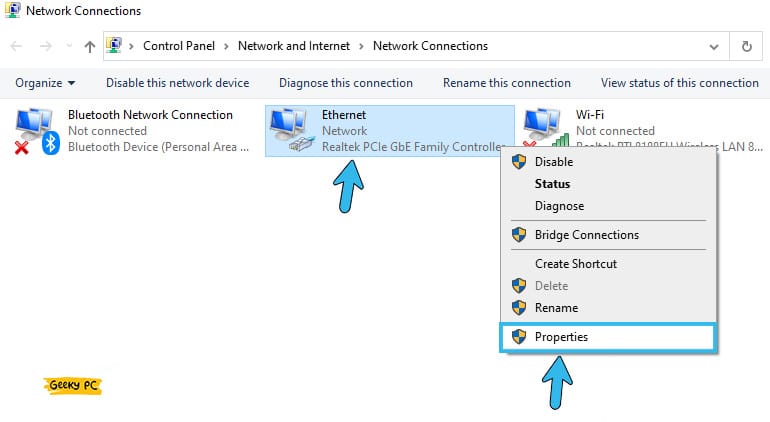
- Step 4: Navigate to the “Internet Protocol Version 4 (TCP/IPv4)” option under the “This connection uses the following item” tab.
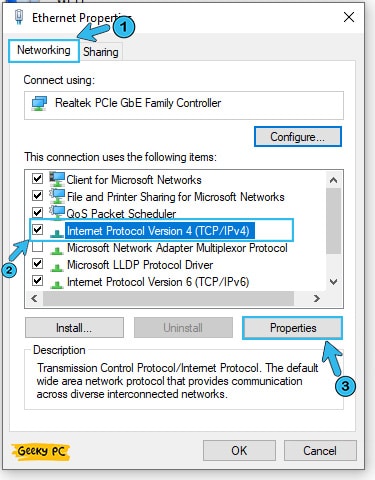
- Step 5: Click on the “Properties” button to launch the IPV4 properties of your ethernet.
- Step 6: Click on the checkboxes adjacent to both the “Obtain an IP address automatically” and “Obtain DNS server address automatically” options.
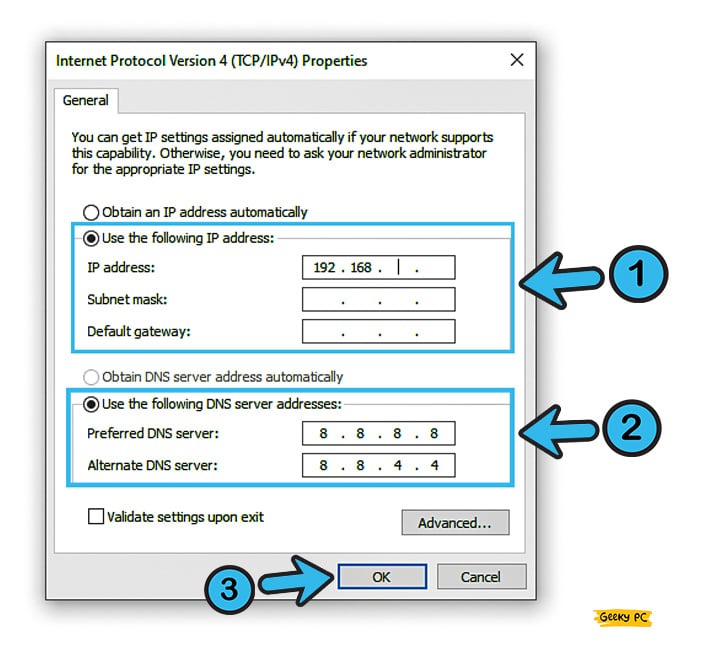
- Step 7: Click “OK” to save the settings and check if you can connect to the internet now.
Don’t use this step if you are using a static IP connection with a manual subnet mask and gateway. If you do that, it will instantly make your IP dynamic, which can further create additional network issues.
7. Disable Proxy Server In LAN Settings
If you are already using a proxy server to bypass the network protocol of your ISP, the network error itself can be deep-rooted in that proxy server itself. In that case, you need to disable the proxy server and use a default gateway to connect to the internet from your Windows 10 PC.
- Step 1: Press the “Windows Key + R” buttons together to initiate the “Run” command.
- Step 2: Once the Run popup box appears, type “inetcpl.cpl” in the field and hit enter.
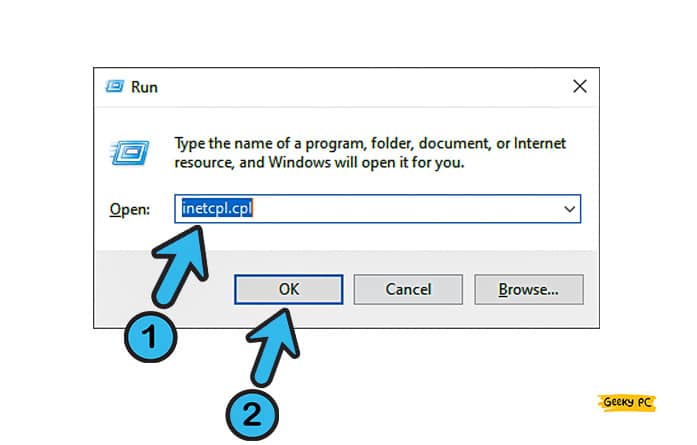
- Step 3: After the “Internet Properties” window appears, navigate to the “Connections” tab from the header menu.
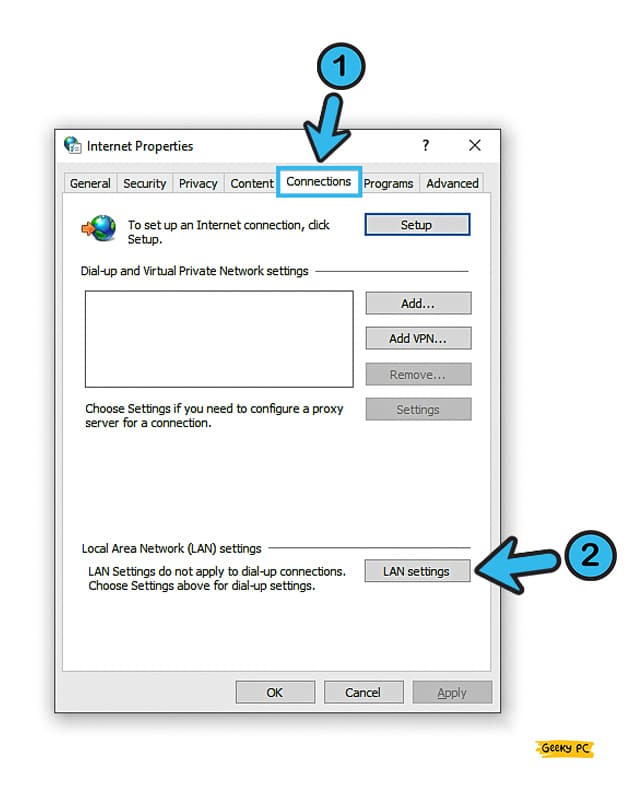
- Step 4: Click on the “LAN settings” button located at the bottom-right corner of the window.
- Step 5: Uncheck the box adjacent to the “Use a proxy server for your LAN (These settings will not apply to dial-up or VPN connections)” option.
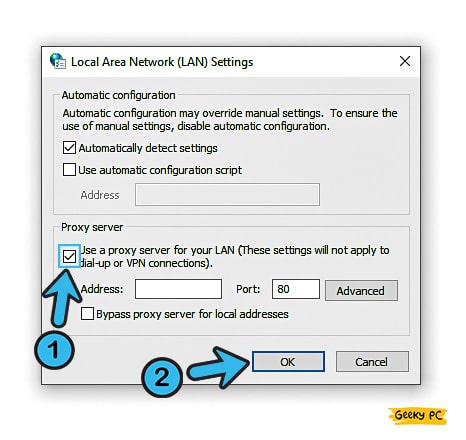
- Step 6: Click “OK” to save the settings and exit from the “Internet Properties” menu.
Even after disabling the default proxy server, you can still bypass the network by using any third-party proxy server or VPN.
However, you don’t need to configure your internet connection for these third-party protocols. Instead, these proxies and VPNs have their own dashboard to tweak the settings.
8. Run Network Troubleshooter
Network troubleshooting is an in-built option newly introduced in the recent version of Windows 10. This program automatically detects the network error and solves it.
So, if none of the generic methods are working, you can resort to the troubleshooter to identify and solve the issue.
- Step 1: Press the “Windows Key + I” buttons together to launch the “Settings” app in Windows 10.
- Step 2: Scroll down and click on the “Update & Security” option.
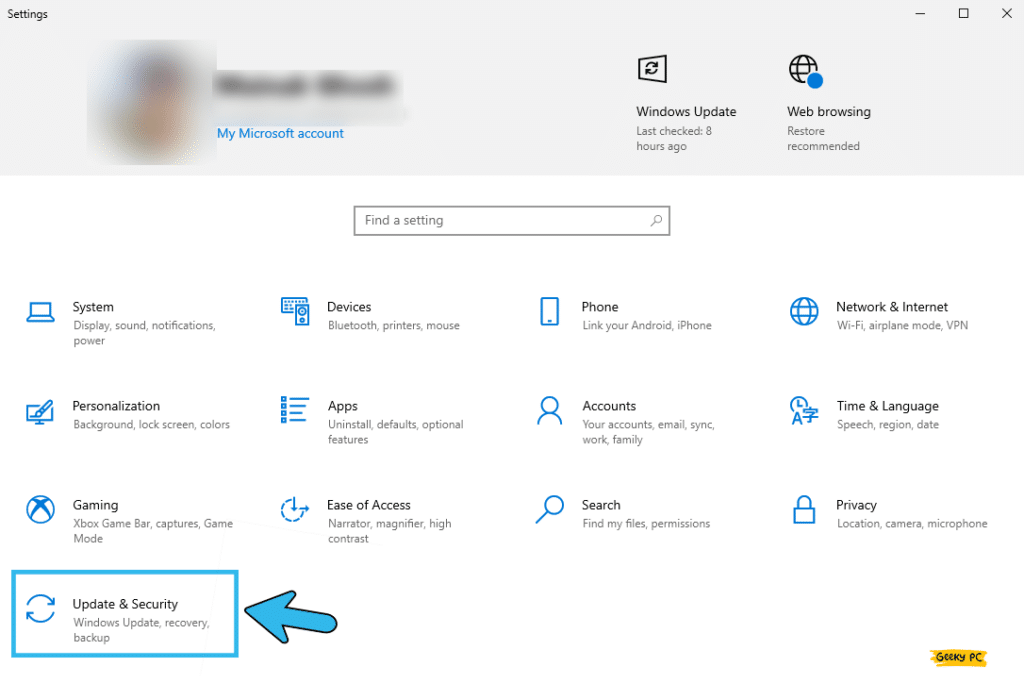
- Step 3: Once the new menu loads, click on the “Troubleshoot” option located on the left panel.
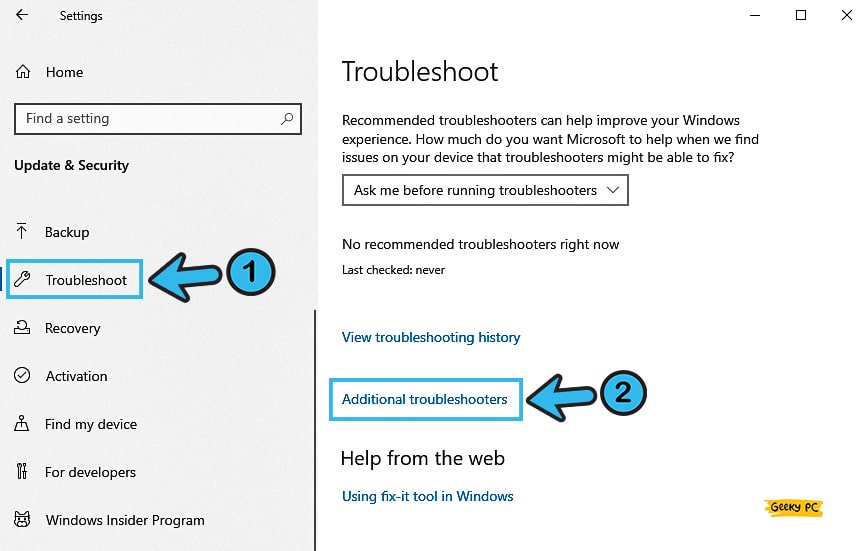
- Step 4: Navigate to the “Additional troubleshooters” option from the right panel.
- Step 5: Once the new window launches, click on the “Internet Connections” option.
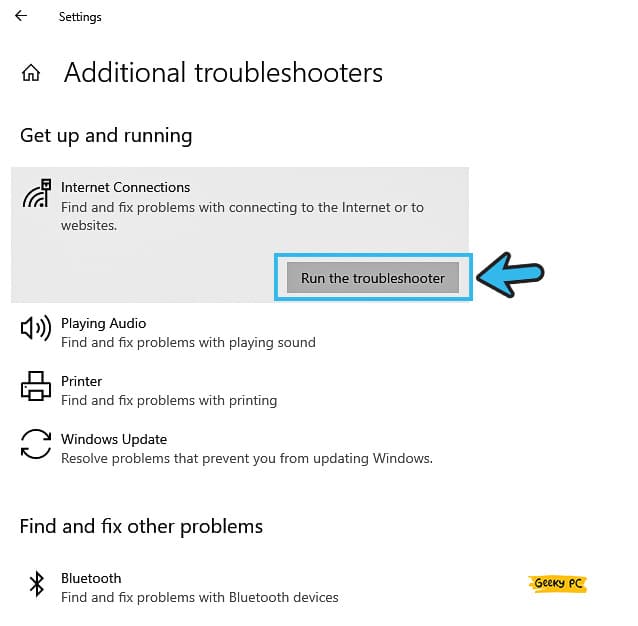
- Step 6: Click on the “Run the troubleshooter” button and follow the on-screen instructions.
- Step 7: After the troubleshooting is completed, restart your PC and connect to the network again.
Many people have reported getting an unresponsive taskbar after running the troubleshooter in the background.
9. Temporarily Disable The Firewall
If your ethernet is not working after Windows 10 update, you may have a faulty firewall configured on your system. So, you either need to tweak the firewall settings to allow the network connection or can disable it permanently to diminish the background interference.
- Step 1: Click on the “Magnifying Glass” icon located at the bottom-left corner of your Windows taskbar.
- Step 2: Type “Control Panel” in the search field and click on the first result.
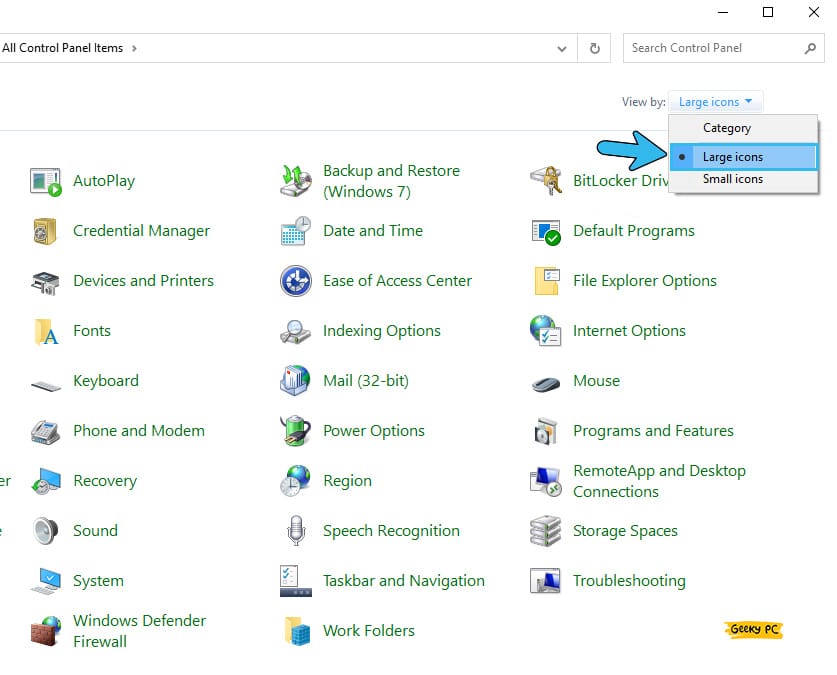
- Step 3: Once the “Control Panel” window launches, navigate to the “View by:” option at the top-right corner and select the “Large icons” option.
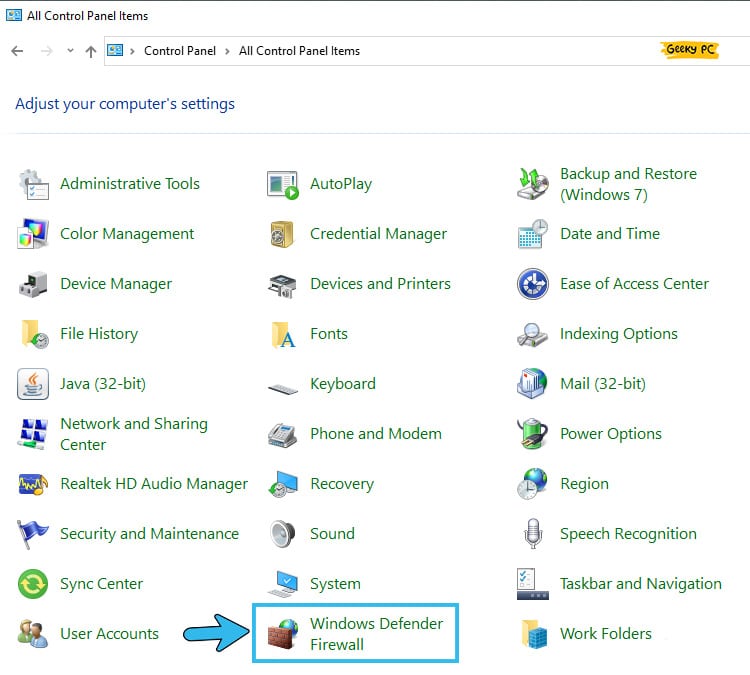
- Step 4: Scroll down and click on the “Windows Defender Firewall” option.
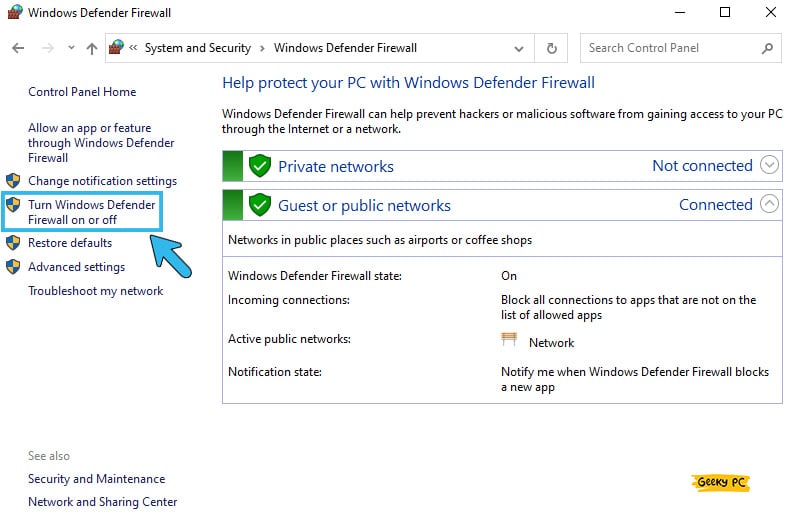
- Step 5: Click on the “Turn Windows Defender Firewall on or off” option located on the left panel.
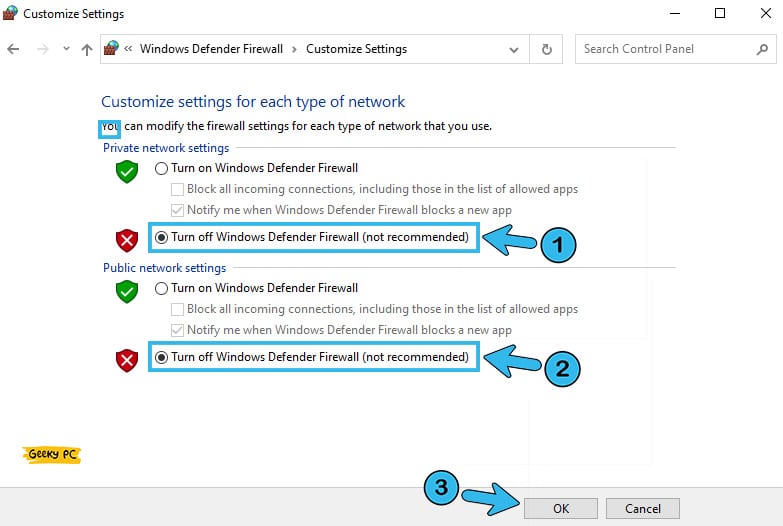
- Step 6: Select “Turn off Windows Firewall” and click “OK” to save the settings.
- Step 7: Restart your system and initiate the network connection without any firewall.
It is not at all recommended to disable the in-built Windows Firewall or any other third-party firewall for a long time.
If you do so, it can create serious security loopholes in your system and makes it vulnerable. So, you need to enable it again once you solve the network issue.
10. Use Google DNS For Ethernet
You either use an automatic DNS or use a specific DNS provided by your ISP. But alternatively, you can use public DNS in your ethernet parameter to bypass any fixed DNS system that can cause interference issues in the background.
So, it is better to use any public DNS such as Google or Cloudflare.
- Step 1: Click on the “Magnifying Glass” icon on your taskbar and type “Settings” in the search bar.
- Step 2: Click on the first result that appears to open the “Settings” app.
- Step 3: Click on the “Network and Internet” option to launch the internet settings.

- Step 4: Once the new window appears, click on the “Change adapter options” under the “Advanced network settings” on the right panel.
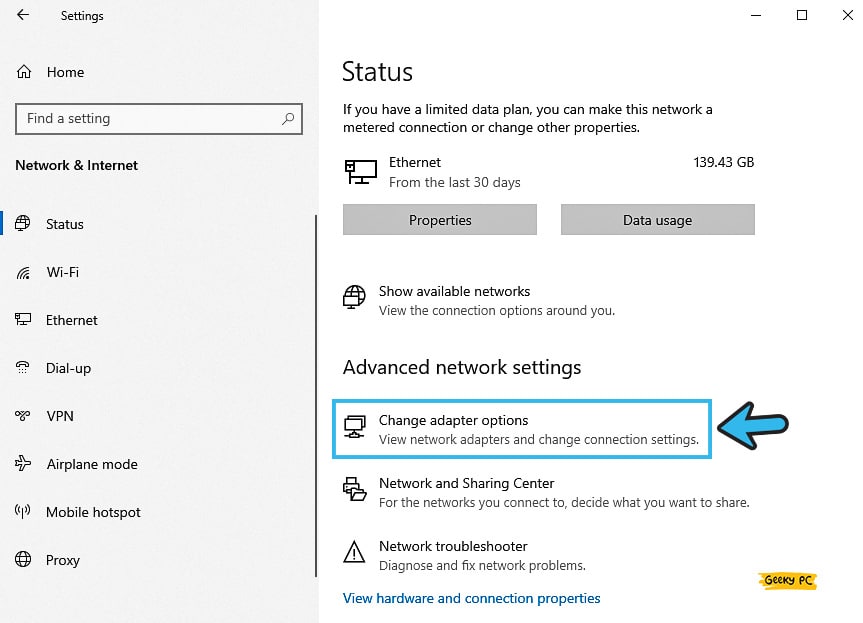
- Step 5: After the new window opens, right-click on the “Ethernet” icon and click on the “Properties” option from the additional menu.

- Step 6: Select the “Internet Protocol Version 4 (TCP/IPv4)” option and click on the “Properties” button.

- Step 7: Once the properties window launches, select the “Use the following DNS server addresses” option and type the following parameters: “Preferred DNS server: 8.8.8.8” and “Alternate DNS server: 8.8.4.4” (For Google DNS) or “Preferred DNS server: 1.1.1.1” (For Cloudflare DNS).
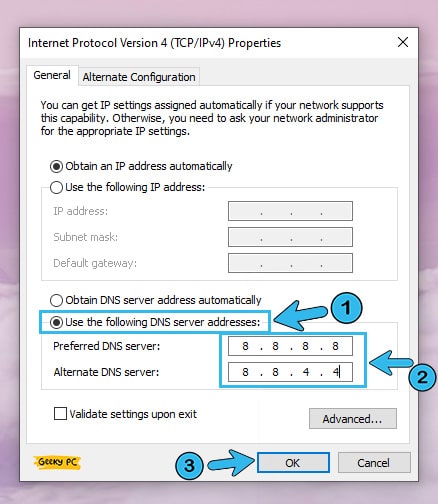
- Step 8: Click the “OK” button to save the settings and reconnect to the internet.
If you use a static IP connection and suddenly change your DNS to a public one, you may encounter an unresponsive gateway. In that case, follow our detailed guide to solve the “ERR_Network_Change” error in Windows 10 systems.
11. Change Ethernet Power Management
If you are using the in-built power management application or have installed any third-party one, it may temporarily disable your ethernet to save power, especially when your PC remains idle for a long time.
So, you need to tweak the power management settings to keep the ethernet port running.
- Step 1: Press the “Windows Key + R” buttons together to launch the “Run” command.
- Step 2: Once it appears, type “devmgmt.msc” in the designated field and hit enter.
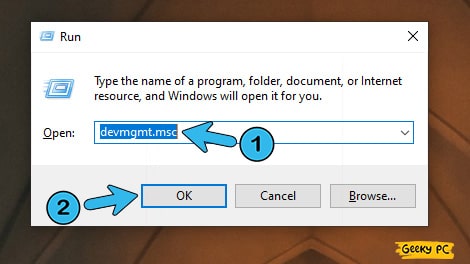
- Step 3: After the “Device Manager” app launches, click on the “Network adapters” option to expand it.
- Step 4: Right-click on your ethernet device (It will be “Realtek PCIe” in most cases) and click on the “Properties” option.
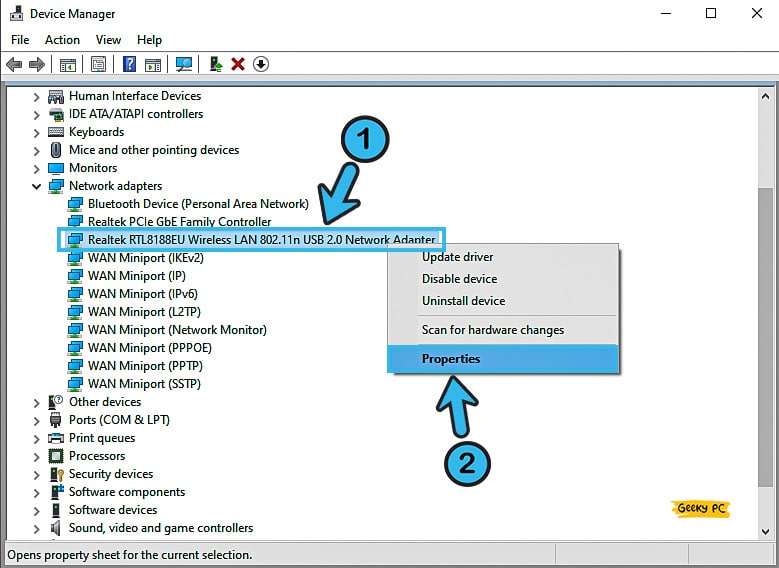
- Step 5: Once the new window appears, click on the “Power Management” option on the header menu.
- Step 6: Uncheck the box adjacent to the “Allow the computer to turn off this device to save power” option.
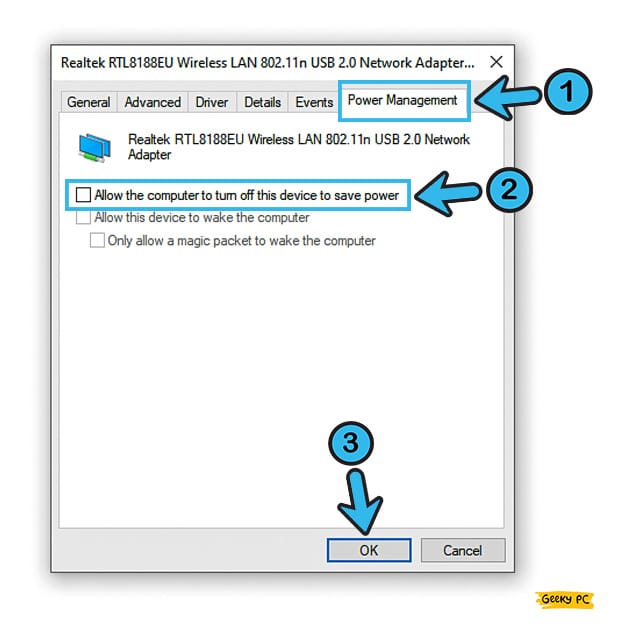
- Step 7: Click the “OK” button to save the settings and restart your device.
Many gamers have reported getting a group policy error after tweaking their power management settings, especially while using a system under administration.
If you face such issues, you can follow our quick fix for the “This program is blocked by group policy” error in Windows 10 systems.
How To Priorities Ethernet Over Wi-Fi in Windows 10?
It may happen that you have already prioritized your Wi-Fi connection over the general ethernet connection, especially if you are using a Windows-based laptop. In that case, you need to manually disable the Wi-Fi port to allow the ethernet connection.
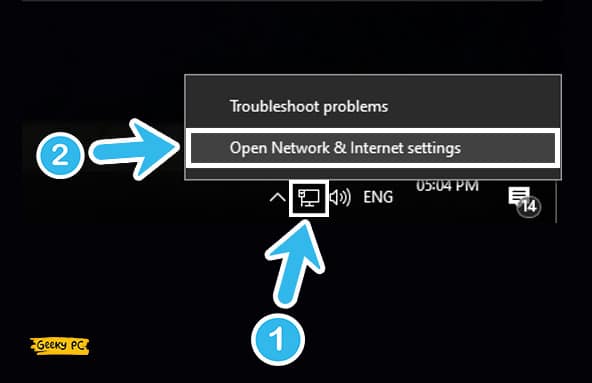
- Step 1: Right-click on the Wi-Fi or LAN icon located at the bottom-right corner of your status bar.
- Step 2: Click on the “Network & Internet settings” option from the additional menu.
- Step 3: Once the settings app appears, navigate to the “Wi-Fi” option on the left panel.
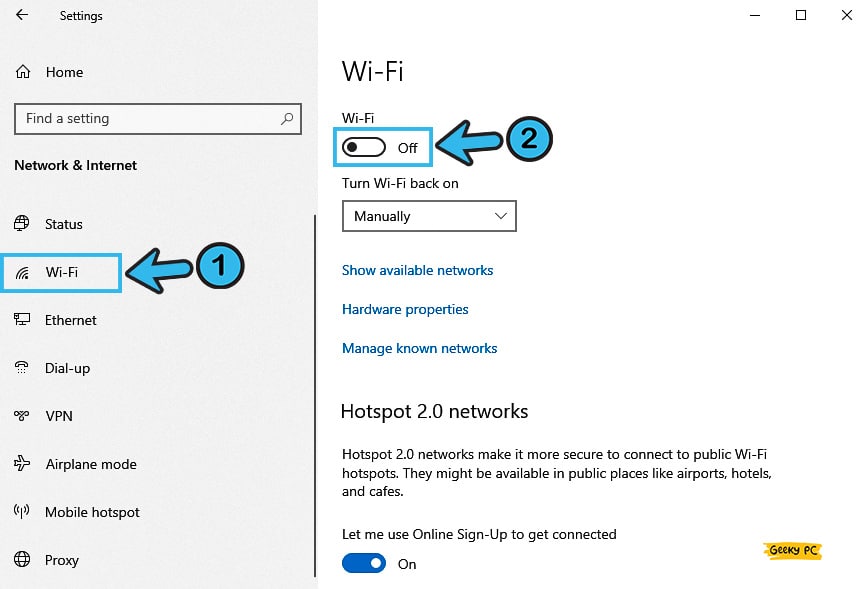
- Step 4: Locate the switch on the right panel and toggle it to disable the Wi-Fi connection.
- Step 5: Check whether the Wi-Fi is disabled and the status bar is only showing the Ethernet connection.
If you haven’t set up a new ethernet connection and have only been using the Wi-Fi since you installed Windows 10 on your system, you need to set up an ethernet connection first. And for that, follow our first solution under the advanced fixes.
Conclusion
Applying the four generic methods, we have listed above will likely solve the ethernet-related errors in most cases. But if you really need to try any advanced methods, you better create a system restore point before going for any advanced tweaks.
So, we think you have already got all the possible solutions if the ethernet is not working in Windows 10. But if you know any other methods to solve this error, feel free to drop them in the comment box below!
FAQs
Q. Why is my ethernet not working on Windows 10?
There can be several reasons why your ethernet is not working in Windows 10, starting from an outdated network driver to a wrongly configured internet option. Besides, using a proxy server and a firewall can also block the ethernet connection in the background.
Q. Why is my wired ethernet not working?
High chances are you may have disabled the ethernet accidentally, or maybe the port itself is unplugged. Besides, you may have prioritized Wi-Fi over ethernet, which is causing this issue. Many people also get this error while using a faulty or outdated ethernet driver.
Q. How do I get Windows 10 to recognize my ethernet?
Type “View network status and tasks” in the search bar and hit enter to open the settings. Then, click on the “Set up a new connection or network” option and further proceed with the “Connect to the Internet” option. Click the “Next” button and choose the “Broadband (PPPoE)” option to let Windows recognize and create a new ethernet connection.
Q. How do I fix an ethernet connection?
Start by re-plugging the ethernet port and enabling it again. You also need to update the driver and disable the firewall to stop any interference issues. If you are using a dynamic IP connection, you need to enable the automatic IP assignment as well. And if nothing works, you need to change the ethernet power management altogether!


Leave a Reply
View Comments